owned this note
owned this note
Published
Linked with GitHub
# Validating on Centrifuge Chain Test Networks Amber and Flint
:::info
# [This has moved here](https://docs.centrifuge.io/chain/get-started/validate/)
:::
Centrifuge has multiple testnets online.
a) **Amber** is for audits and testing of the stability of release candidates. Think of Amber as a way to test beta releases.
b) **Flint** is for breaking changes and testing the integration with other parts of the Centrifuge ecosystem. Think of Flint as a way to test previews, alpha releases.
## View the status of the testnets on Polkadot Telemetry
a) Amber: https://telemetry.polkadot.io/#list/Centrifuge%20Testnet%20Amber%20CC2
b) Flint: https://telemetry.polkadot.io/#list/Centrifuge%20Testnet%20Flint%20CC3
## View extrinsics and events of the testnets on Polkascan
a) Amber: https://polkascan.io/pre/centrifuge-amber
b) Flint: currently not deployed
## Create an account/key pair to receive tokens
1. Open the Portal:
a) Amber: https://portal.chain.centrifuge.io/#?rpc=wss://fullnode.amber.centrifuge.io
b) Flint: https://portal.chain.centrifuge.io/#?rpc=wss://fullnode.flint.centrifuge.io
1. Create a new account for your user by navigating to "Accounts" and clicking "Add account". Fill in the form, e. g. for Peter Parker: 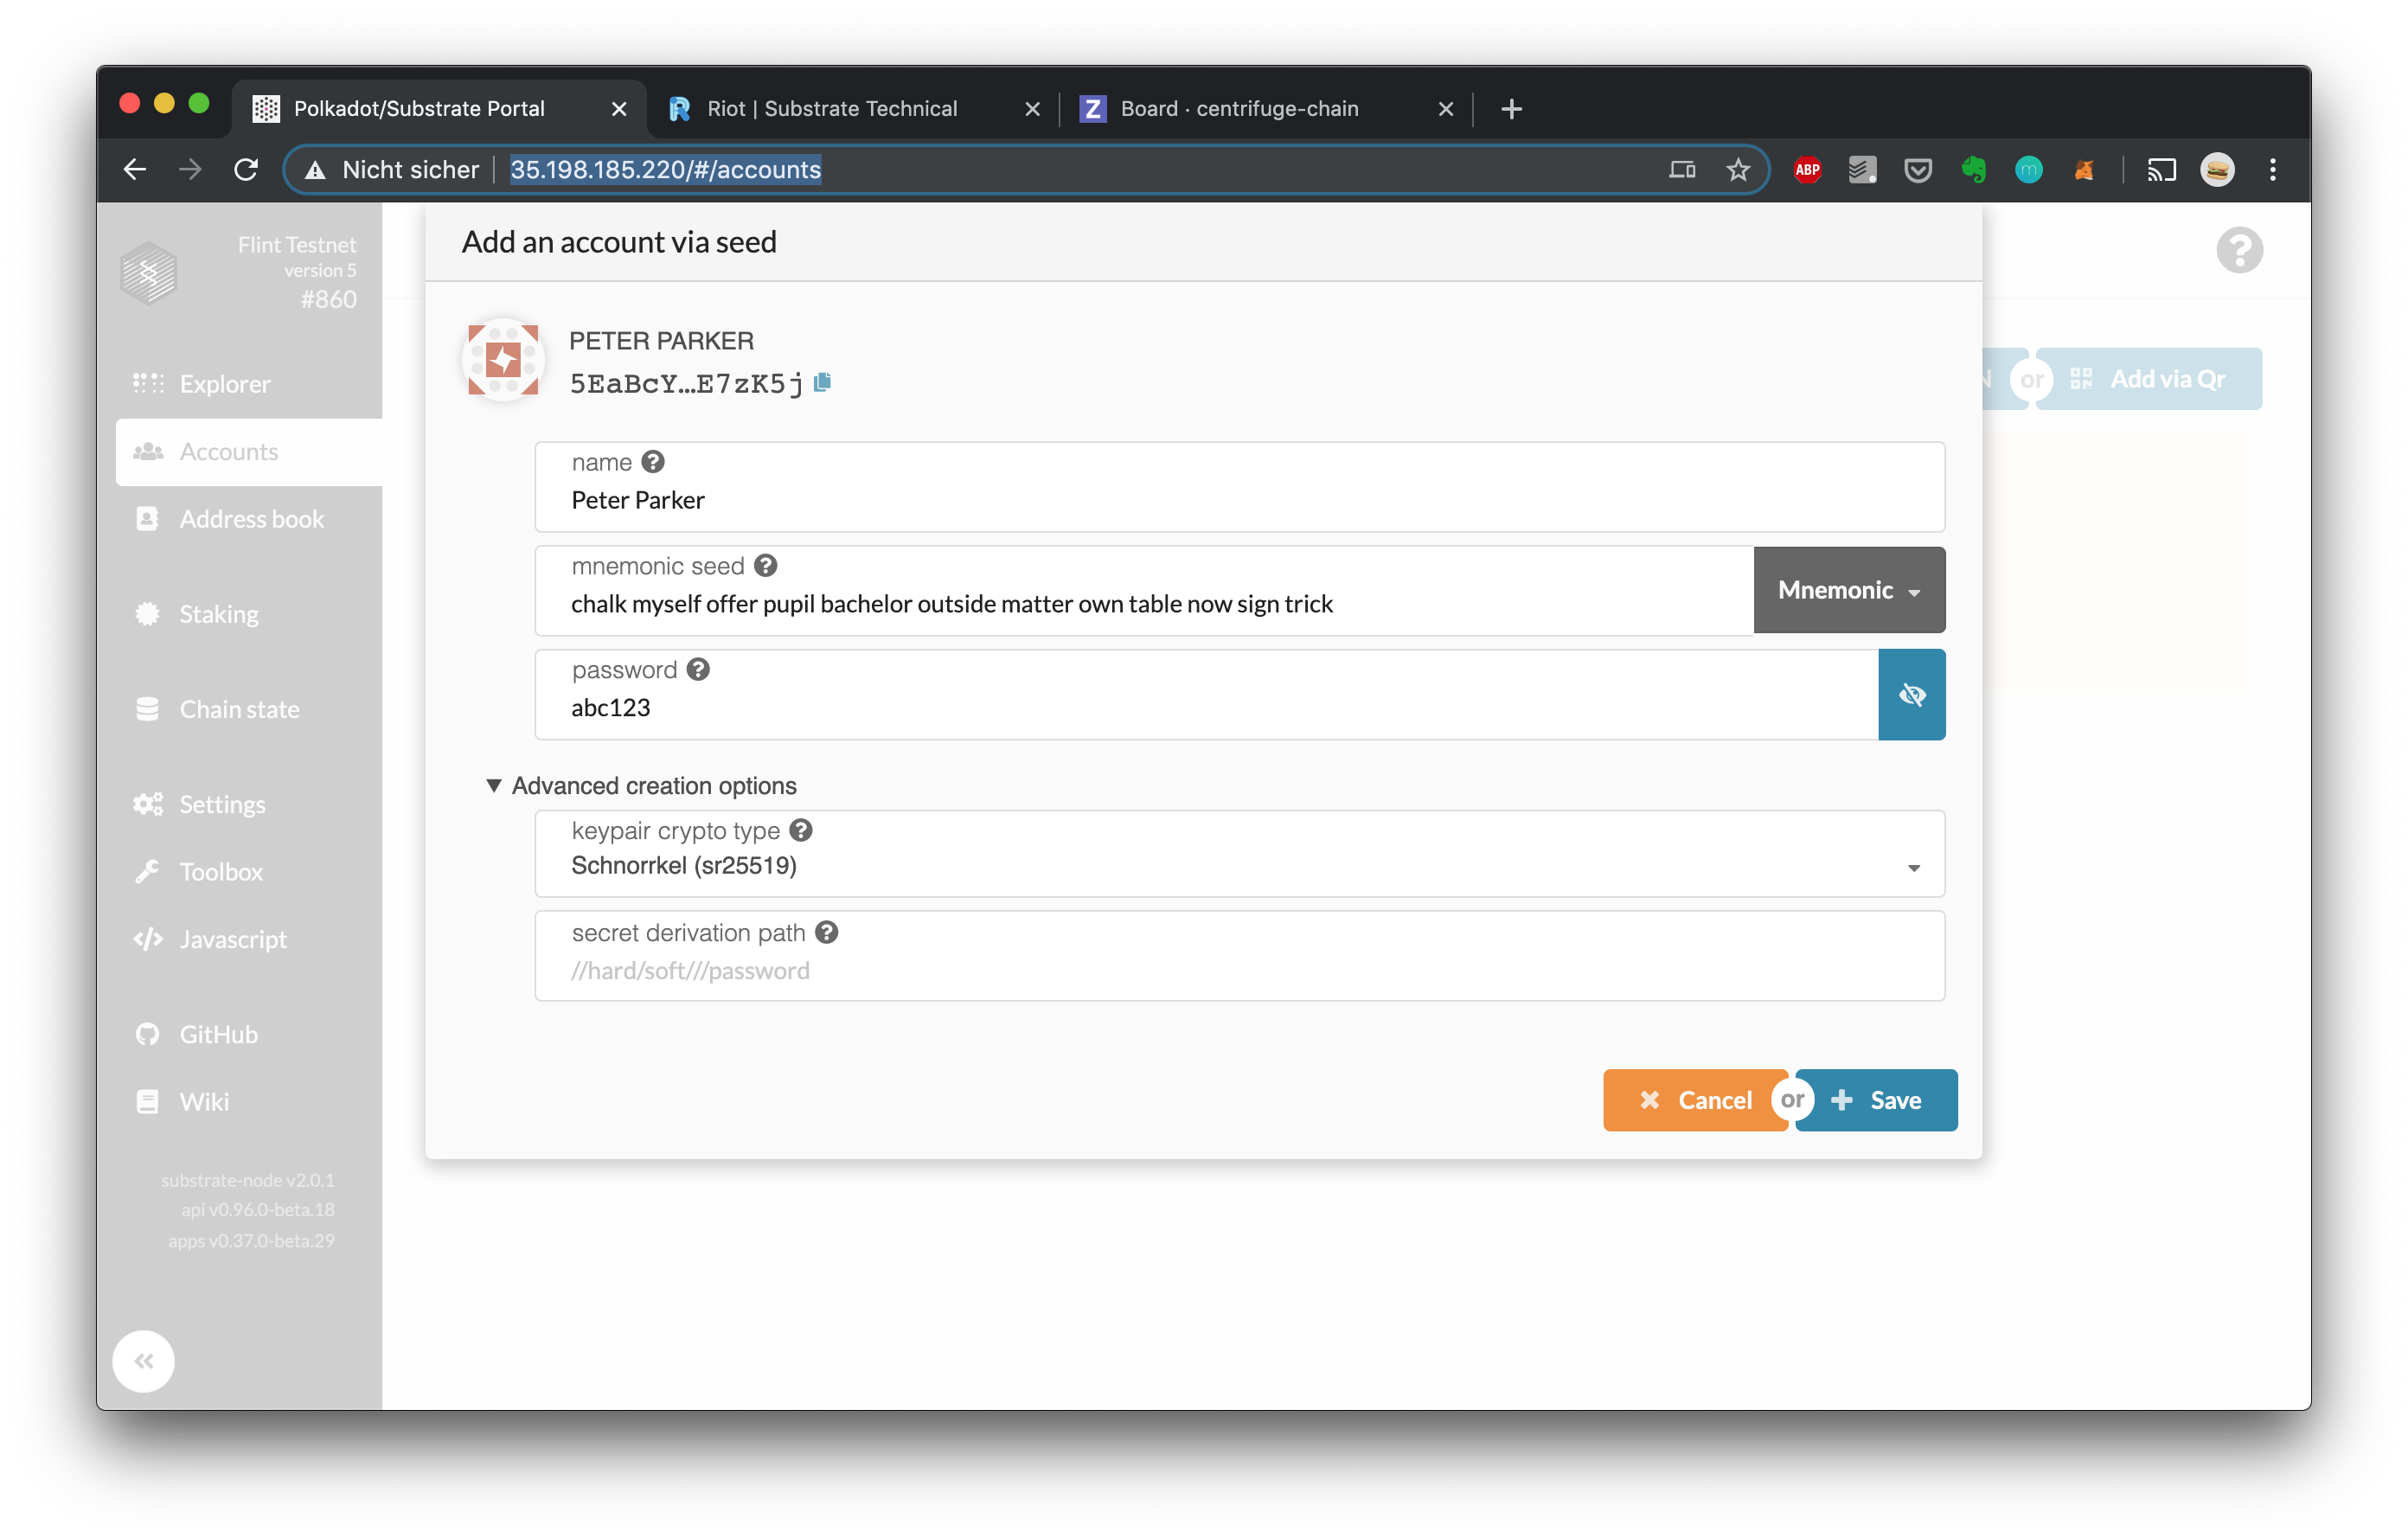
1. Click "Save" and then "Create and backup account". Make sure you save the downloaded JSON file in a safe place.
1. Done! You can now copy your address and send it to others to receive tokens. The address is the string starting with `5...` under the name of your account, e. g. `5HKk5u...wp29Zd` in the following. You can copy it by clicking the icon besides your name: 
## Getting tokens
To run a validator you need to stake Amber Radial (ARAD) or Flint Radial (FRAD) tokens.
To get started setting up your accounts, you can use the [BlockX Labs Faucet](https://faucets.blockxlabs.com/centrifuge). Once you are ready and need more ARAD/FRAD for staking, please reach out to us with your address so we can send you the appropriate amount.
## Run your own node on Amber/Flint
To run your own node, you have 2 options:
1. **Docker Container**
This is the recommended way to experiment with your own node. It will get you started within 5 minutes. Since docker is running pre-build containers, this setup minimizes the steps required to get started and isolates any potential issues.
2. **Bare Metal**
Running a bare metal setup requires you to compile centrifuge chain from source, which can take between a 10 minutes up to 4 hours, depending on your specs. For a production grade setup, we do recommend to run a bare metal validators for 2 reasons: a) It minimizes the tools involved, which increases security, b) The performance is slightly supperior.
### Option 1) Run your node in a Docker Container
1. Ensure you have [docker](https://docs.docker.com/install/) as well as [subkey](https://substrate.dev/docs/en/development/tools/subkey#installation) installed.
1. Generate a new key pair with subkey that will be used as your node-key: `subkey generate`. Make sure you save the output in a safe place.
1. Start your node by running the following, where {name} is the name that will show up in Polkadot Telemetry and {node-key} is the private key you just generated (without the `0x` prefix). Note that we do expose RPC and WS ports here for simplicity – these ports should not be exposed in a production grade setup.
a) Amber:
```
docker run -p 30333:30333 -p 9933:9933 -p 9944:9944 --rm -it centrifugeio/centrifuge-chain:20200322182402-b0a646c \
centrifuge-chain \
--validator \
--name="{name}" \
--node-key={node-key} \
--chain=amber \
--bootnodes=/ip4/35.242.216.93/tcp/30333/p2p/QmeoT4nzw5QDRaqdkBfnaqW9grMTLiEuYUpu4hSbseKB8C \
--bootnodes=/ip4/34.89.161.185/tcp/30333/p2p/QmbNXcLkbD7Z2BaSUTfqb1VEkEDTij9rhS79b8F2uiJ3Ki \
--unsafe-rpc-external --unsafe-ws-external --rpc-cors=all
```
b) Flint:
```
docker run -p 30333:30333 -p 9933:9933 -p 9944:9944 --rm -it centrifugeio/centrifuge-chain:20200322182402-b0a646c \
centrifuge-chain \
--validator \
--name="{name}" \
--node-key={node-key} \
--chain=flint \
--bootnodes=/ip4/34.89.190.227/tcp/30333/p2p/QmdMJoLc6yduqfrJtMAB6xHegydr3YXzfDCZWEYsaCJaRZ \
--bootnodes=/ip4/35.234.68.18/tcp/30333/p2p/Qma5M7P5qym3Gfgp1wu6yk1QyMv2RzFV9GztP9AxHoK8PK \
--unsafe-rpc-external --unsafe-ws-external --rpc-cors=all
```
4. Generate new session keys in your node's keystore by running: `curl -H 'Content-Type: application/json' --data '{ "jsonrpc":"2.0", "method":"author_rotateKeys", "id": 1 }' http://127.0.0.1:9933` This command will return the public keys under the "result" field starting with `0x...`, which you should copy in order to use them in the next chapter.
### Option 2) Run a bare metal node
1. Install dependencies:
a) On Unix systems (Debian, Ubuntu, ...): `sudo apt install -y cmake pkg-config libssl-dev git gcc build-essential clang libclang-dev`
b) On MacOS: `brew install openssl cmake llvm`
1. Install Rust: `curl https://sh.rustup.rs -sSf | sh`
1. Make sure that you are using the latest Rust stable by default: `rustup default stable`
1. Install nightly for WASM support: `rustup update nightly`
1. Add the WASM target: `rustup target add wasm32-unknown-unknown --toolchain nightly`
1. Clone centrifuge-chain:
a) Amber/Flint: `git clone -b v1.0.0-beta git@github.com:centrifuge/centrifuge-chain.git`
7. Change directory: `cd centrifuge-chain`
4. Optional - run the tests: `cargo test --all`
5. Build Centrifuge Chain: `cargo build --release`
6. Ensure you have [subkey](https://substrate.dev/docs/en/development/tools/subkey#installation) installed (can be on another machine).
7. Generate a new key pair with subkey that will be used as your node-key: `subkey generate`. Make sure you save the output in a safe place.
8. Find out your current working directory: `pwd`
9. Create a service, where {pwd} is your current working directory, {name} is the name that will show up in Polkadot Telemetry and {node-key} is the private key you just generated (without the 0x prefix): `vim /etc/systemd/system/centrifuge-chain.service`
a) Amber:
```service
[Unit]
Description=Centrifuge Chain Validator
After=network.target
StartLimitIntervalSec=0
[Service]
Type=simple
Restart=always
RestartSec=1
ExecStart={pwd}/target/release/centrifuge-chain \
--validator \
--name="{name}" \
--node-key={node_key} \
--chain=amber \
--bootnodes=/ip4/35.242.216.93/tcp/30333/p2p/QmeoT4nzw5QDRaqdkBfnaqW9grMTLiEuYUpu4hSbseKB8C \
--bootnodes=/ip4/34.89.161.185/tcp/30333/p2p/QmbNXcLkbD7Z2BaSUTfqb1VEkEDTij9rhS79b8F2uiJ3Ki
[Install]
WantedBy=multi-user.target
```
b) Flint:
```service
[Unit]
Description=Centrifuge Chain Validator
After=network.target
StartLimitIntervalSec=0
[Service]
Type=simple
Restart=always
RestartSec=1
ExecStart={pwd}/target/release/centrifuge-chain \
--validator \
--name="{name}" \
--node-key={node_key} \
--chain=flint \
--bootnodes=/ip4/34.89.190.227/tcp/30333/p2p/QmdMJoLc6yduqfrJtMAB6xHegydr3YXzfDCZWEYsaCJaRZ \
--bootnodes=/ip4/35.234.68.18/tcp/30333/p2p/Qma5M7P5qym3Gfgp1wu6yk1QyMv2RzFV9GztP9AxHoK8PK \
[Install]
WantedBy=multi-user.target
```
14. Start your service: `systemctl start centrifuge-chain`
1. Enable automatic restarts of your service after every boot: `systemctl enable centrifuge-chain`
1. To view and follow your logs, run `tail -f /var/log/syslog`
1. Generate new session keys in your node's keystore by running: `curl -H 'Content-Type: application/json' --data '{ "jsonrpc":"2.0", "method":"author_rotateKeys", "id": 1 }' http://127.0.0.1:9933` This command will return the public keys under the "result" field starting with `0x...`, which you should copy in order to use them in the next chapter.
## Start to validate on Amber/Flint
1. Open the Portal:
a) Amber: https://portal.chain.centrifuge.io/#?rpc=wss://fullnode.amber.centrifuge.io
b) Flint: https://portal.chain.centrifuge.io/#?rpc=wss://fullnode.flint.centrifuge.io
1. Create a new key pair for your validator – a stash account (`Vanessa Stash` in this example) that is holding the funds to be staked/bonded and can transfer them, and a separate controller account (`Vanessa` in this example) that will be able to switch between validating/nominating/chilling and can set session keys, which will be used for the validator tasks such as block proposals, finalization etc: 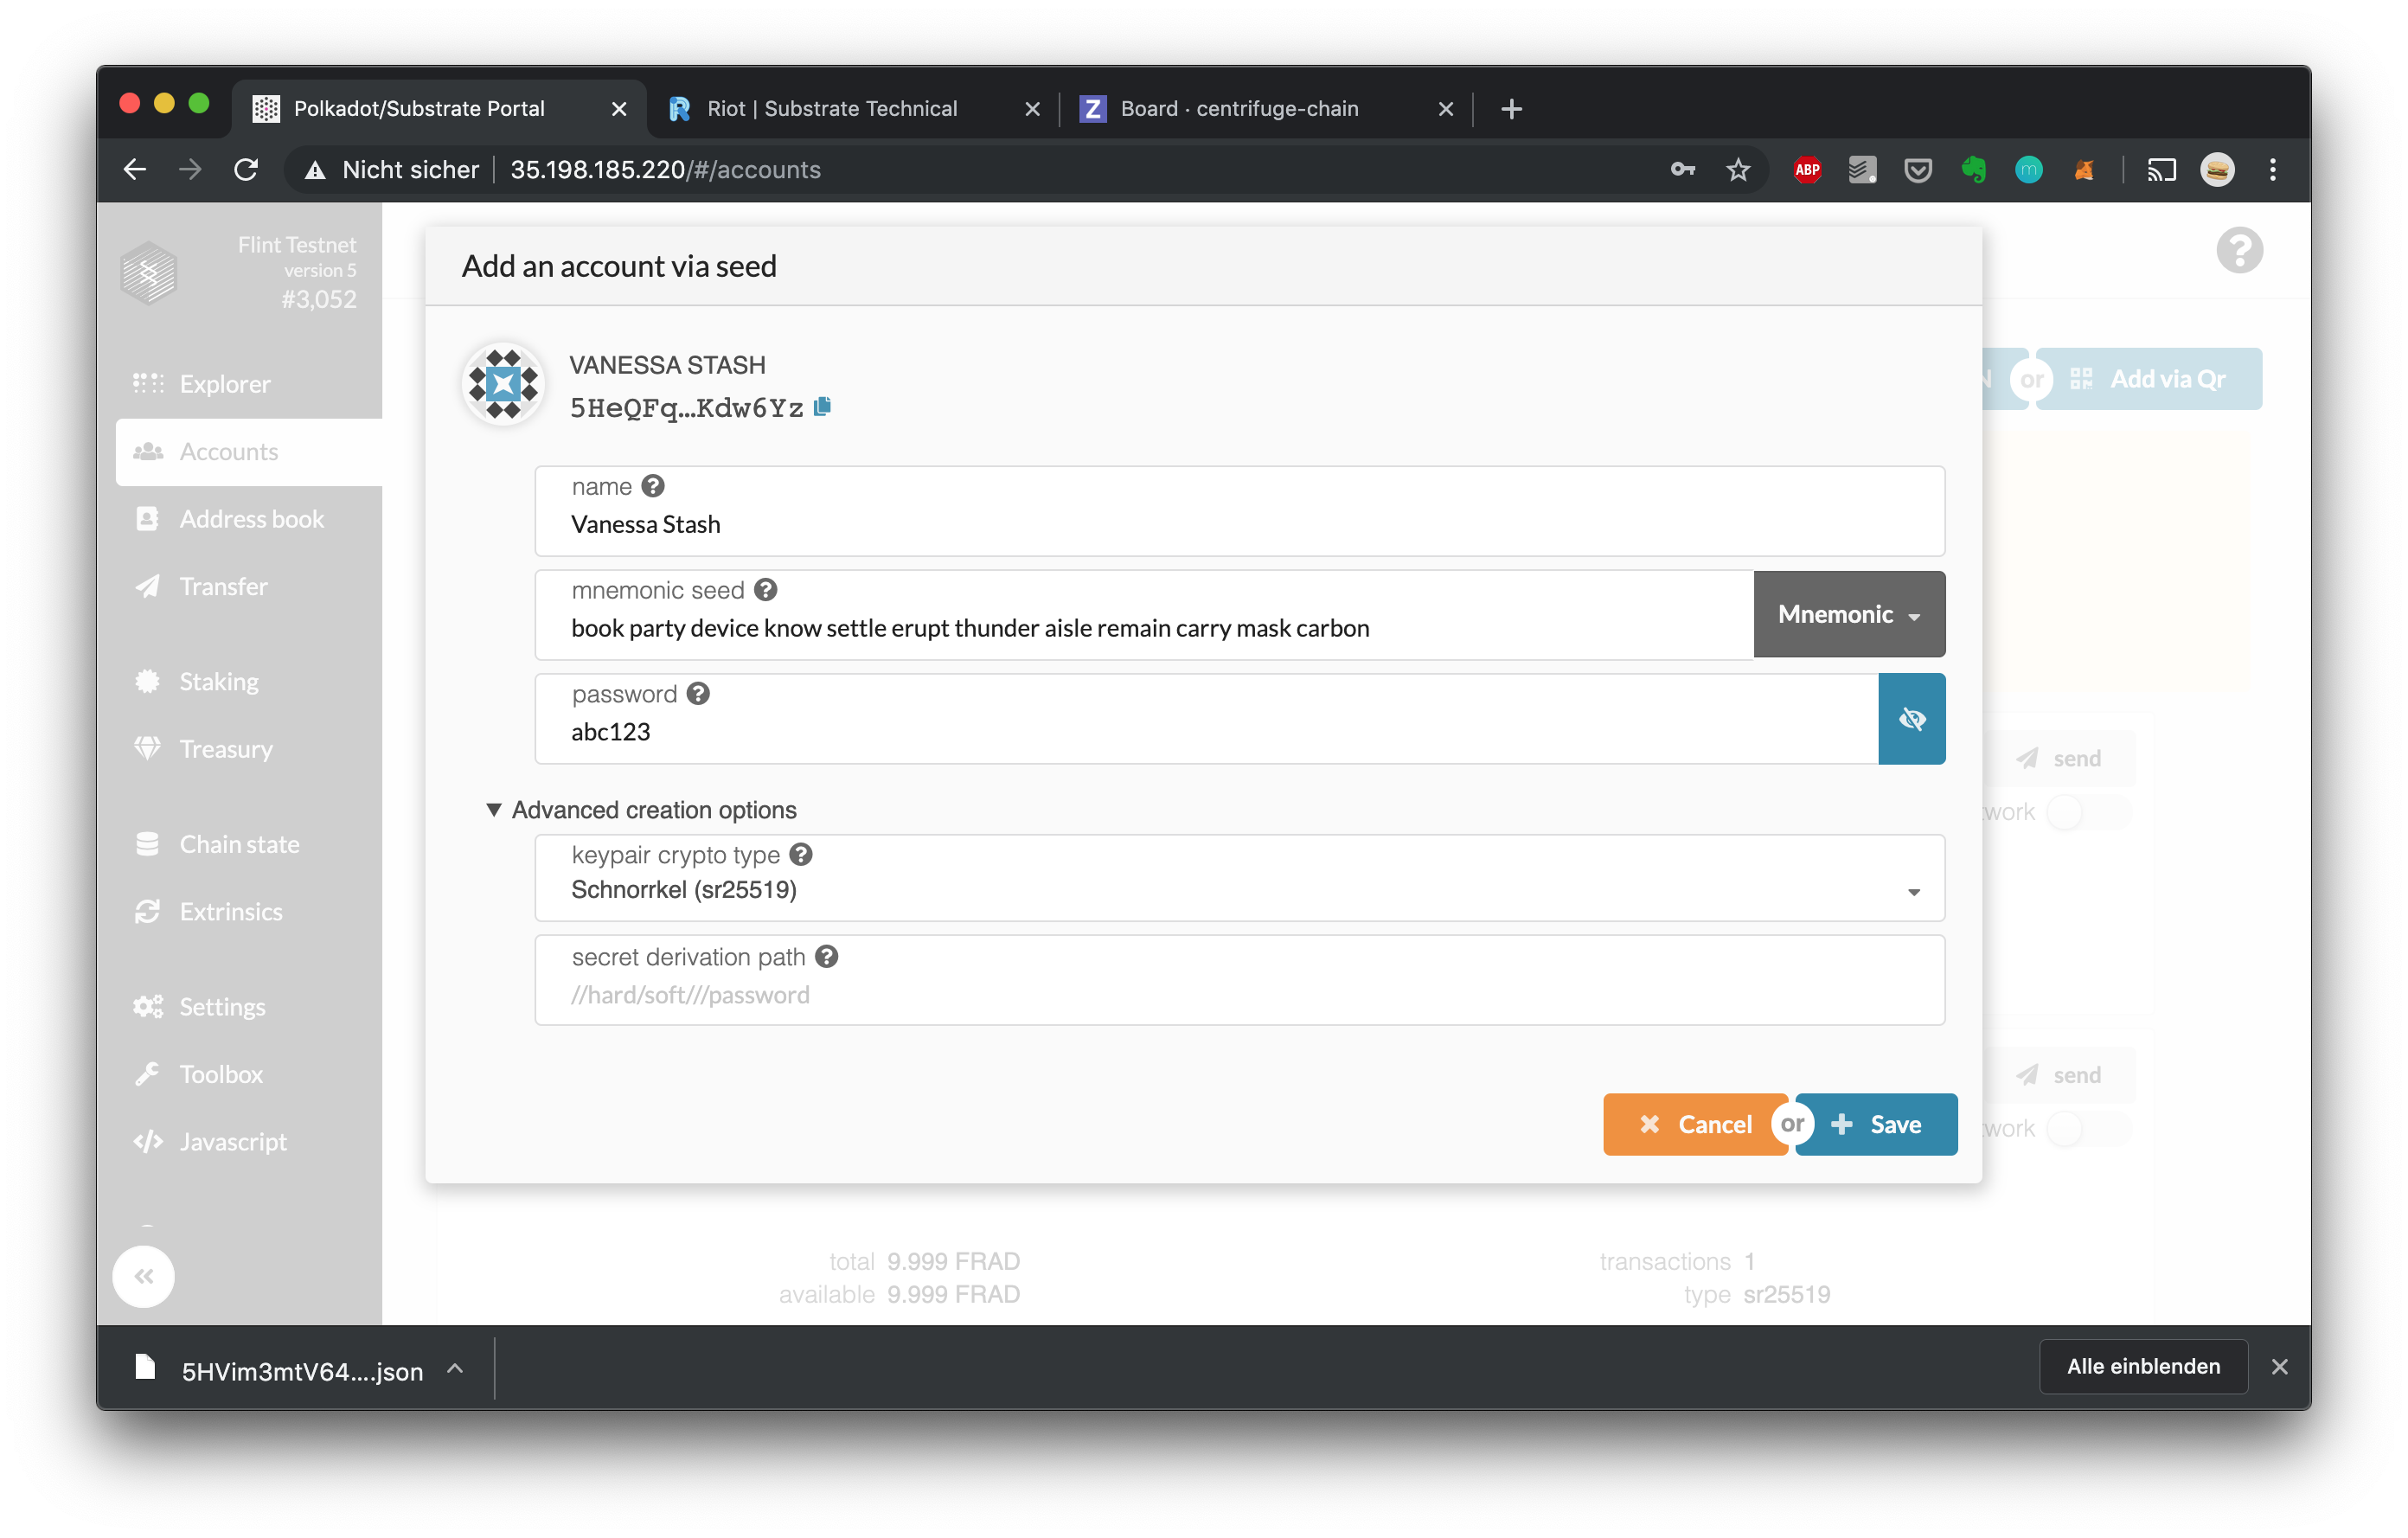 
1. Send tokens to your stash (for staking) and controller accounts (small amount to pay fees for actions) as described above. In order to become a validator, the stash account needs to own enough tokens to replace another validator in the next era. 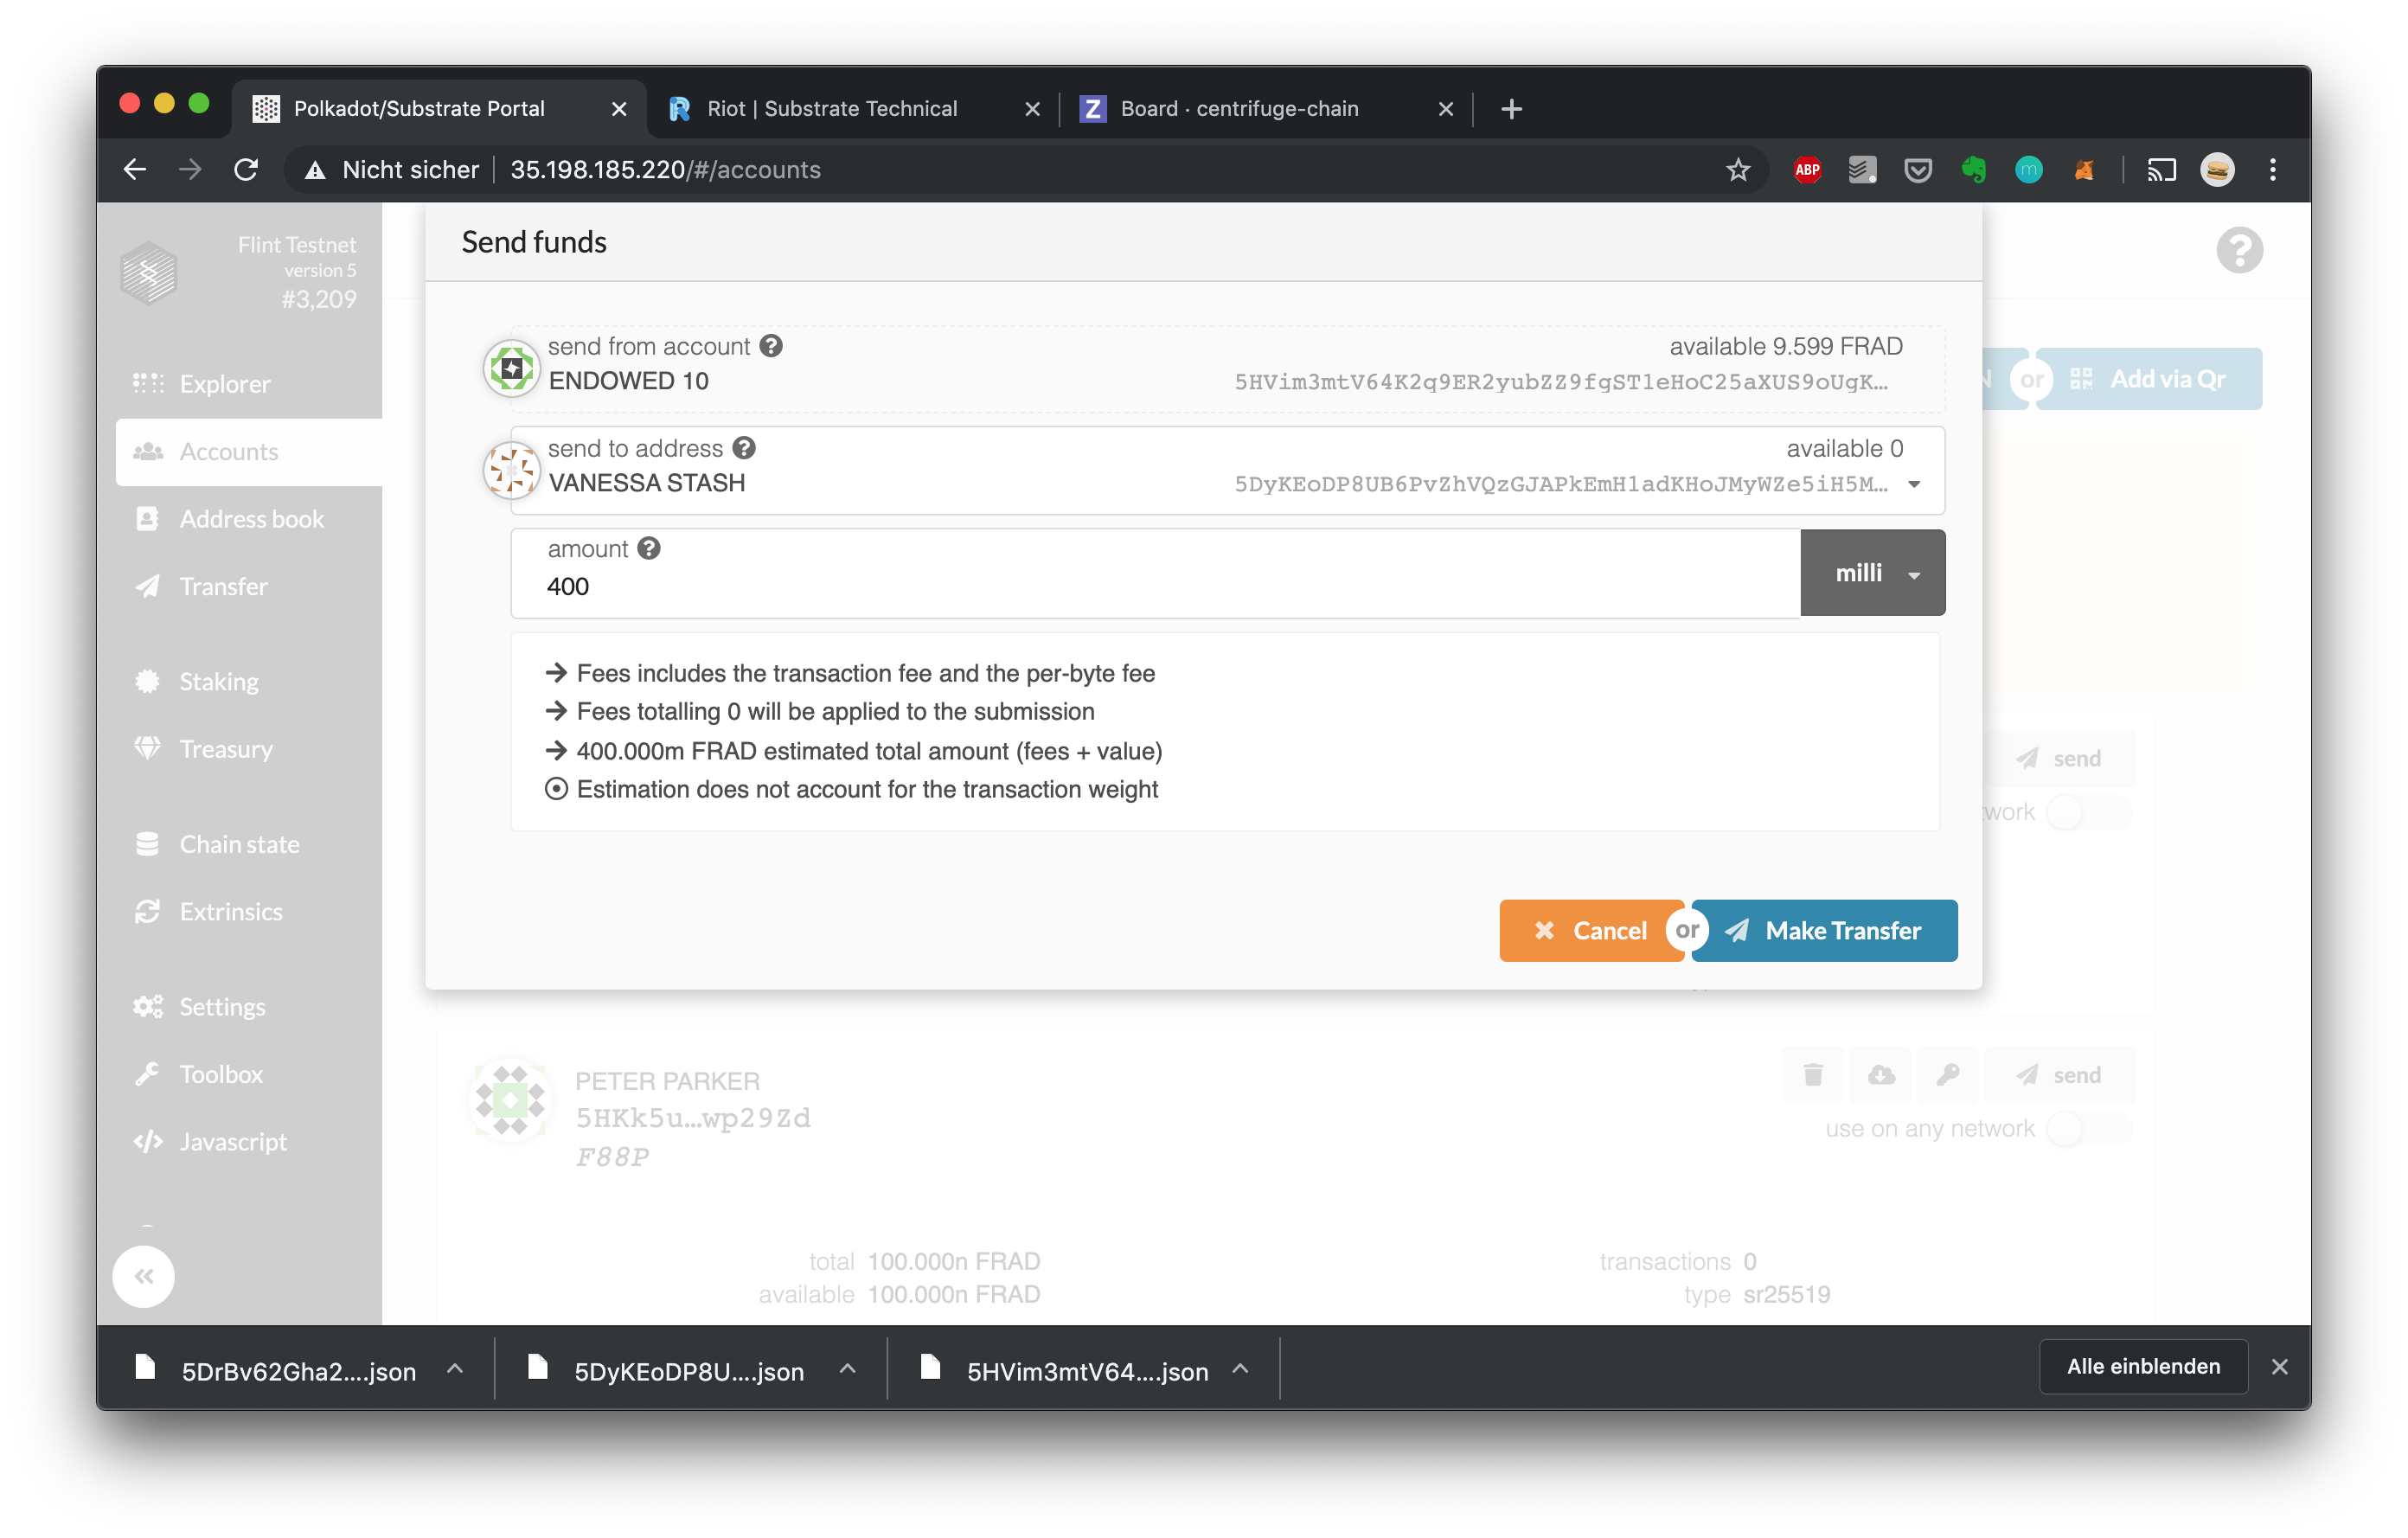

1. Head over to the staking screen and create a new stake 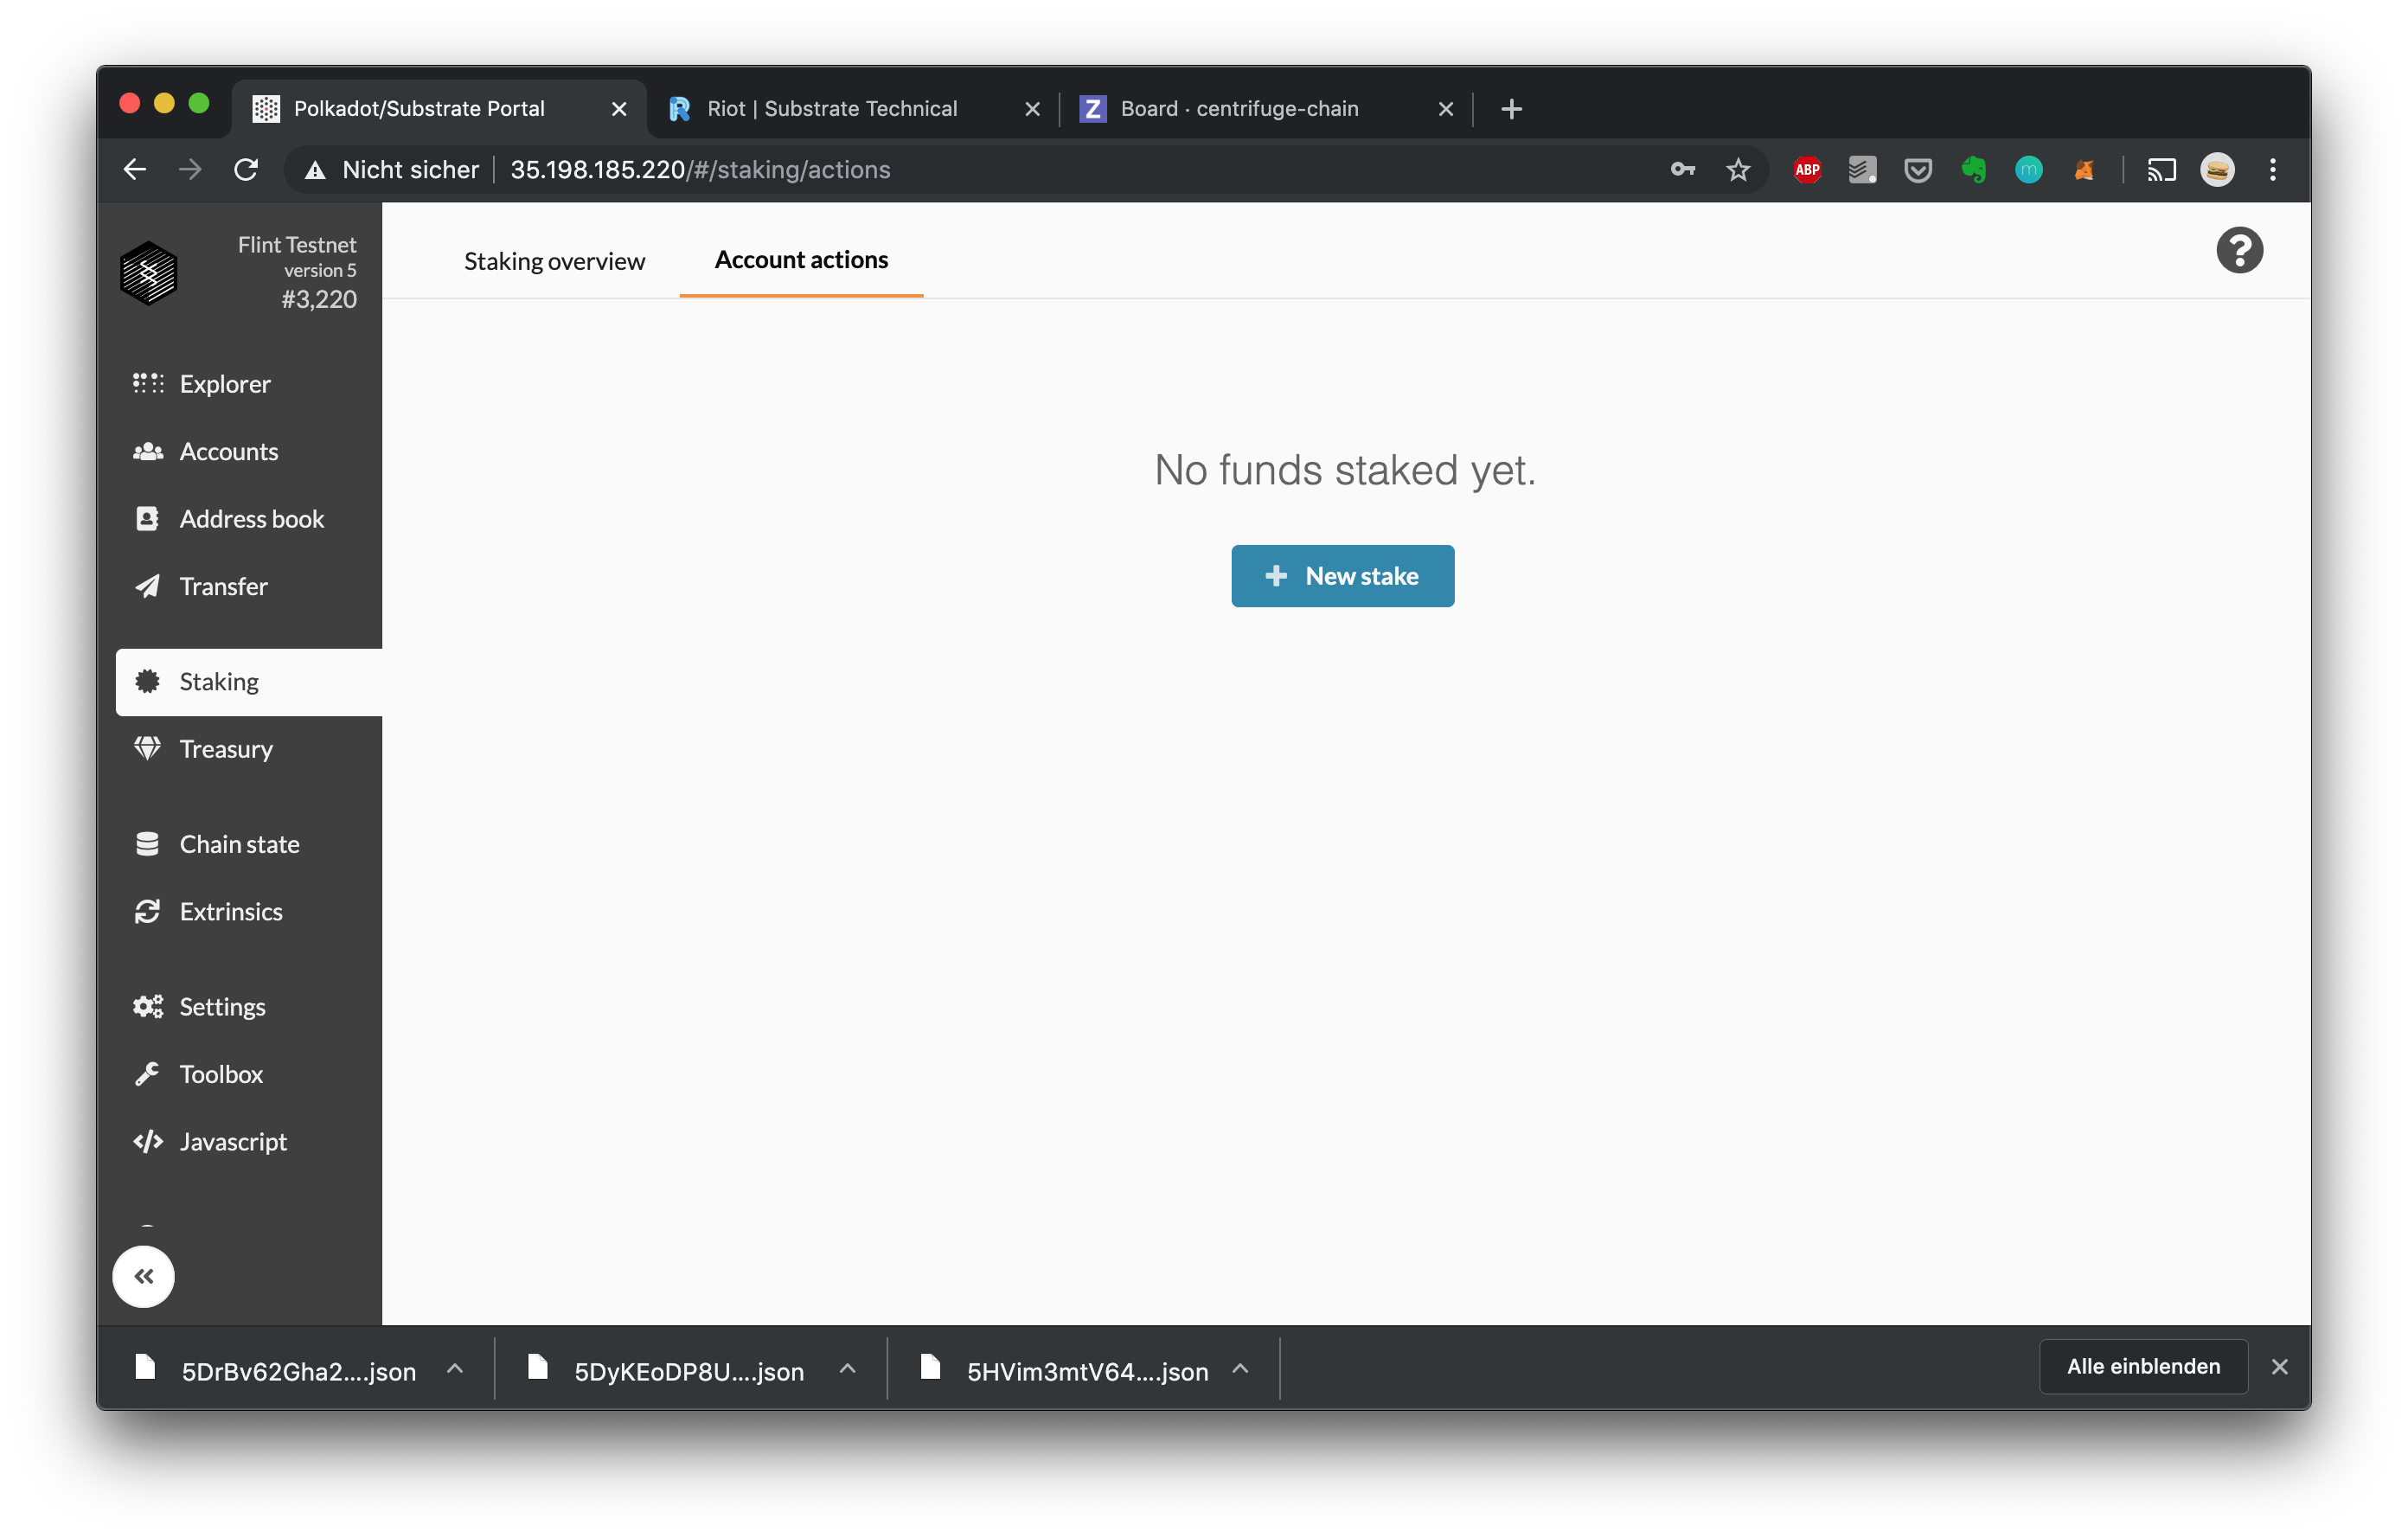 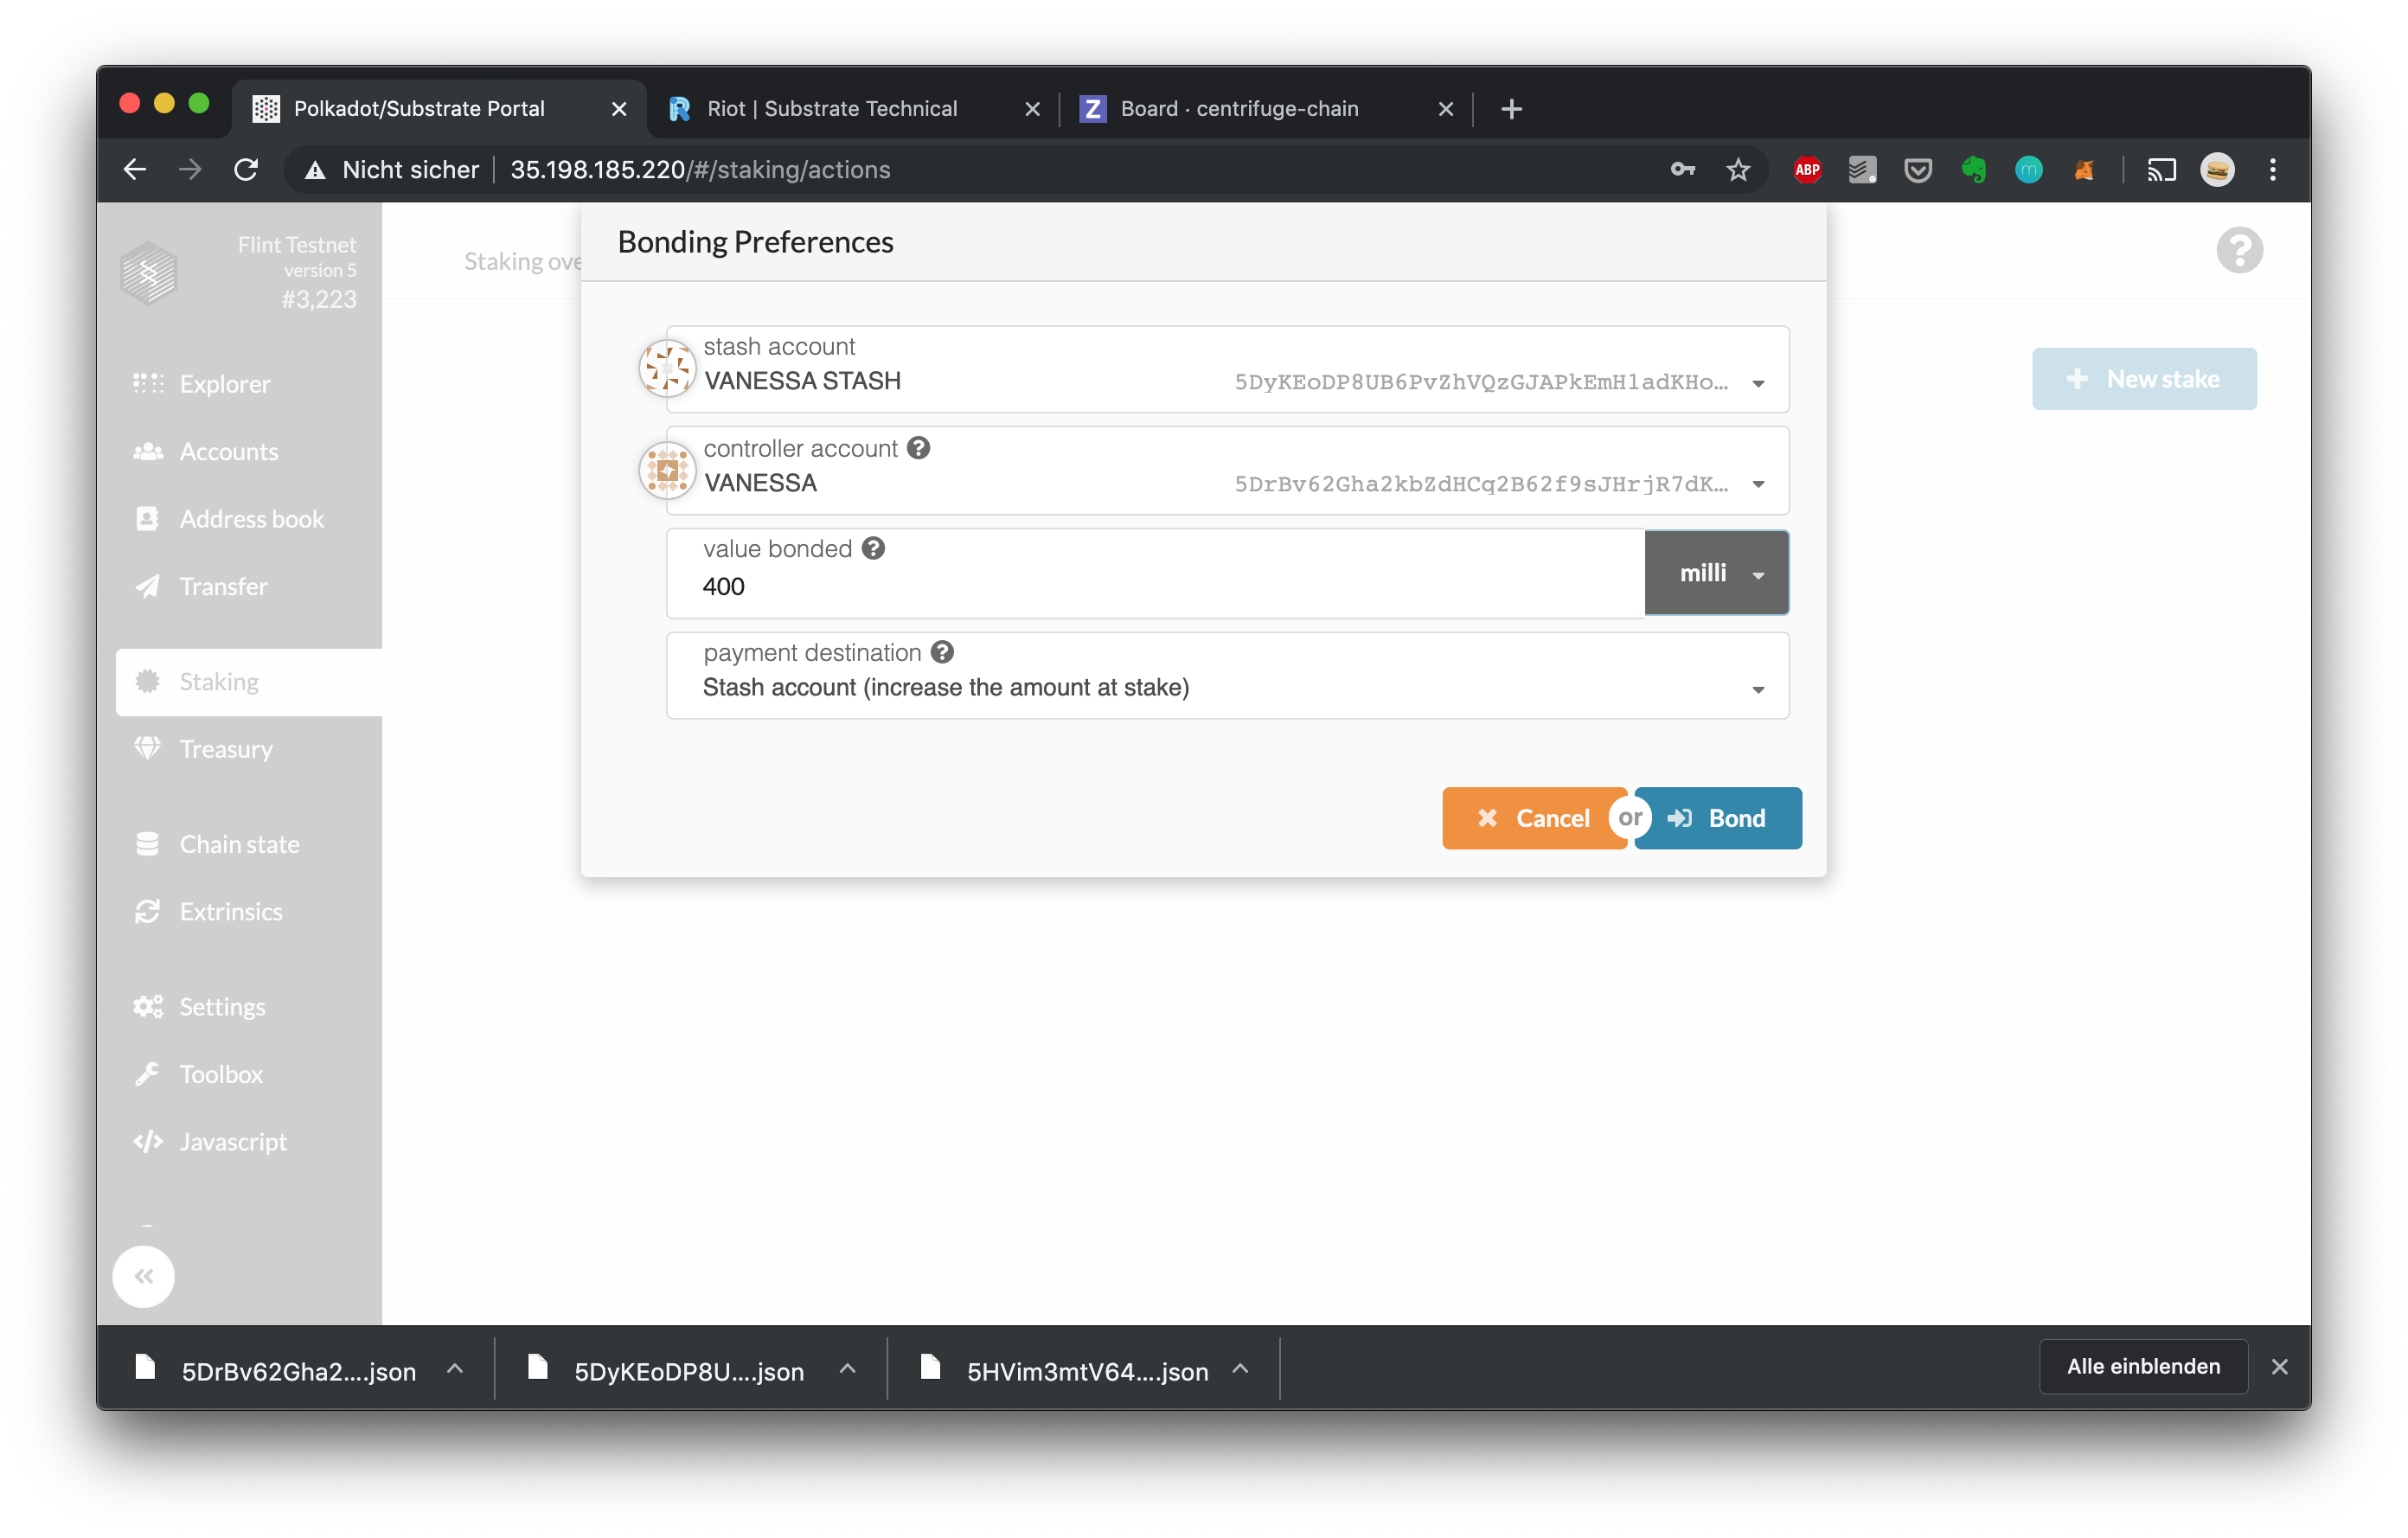
1. Set the session keys you obtained in the [previous chapter](#Run-your-own-node-on-AmberFlint): 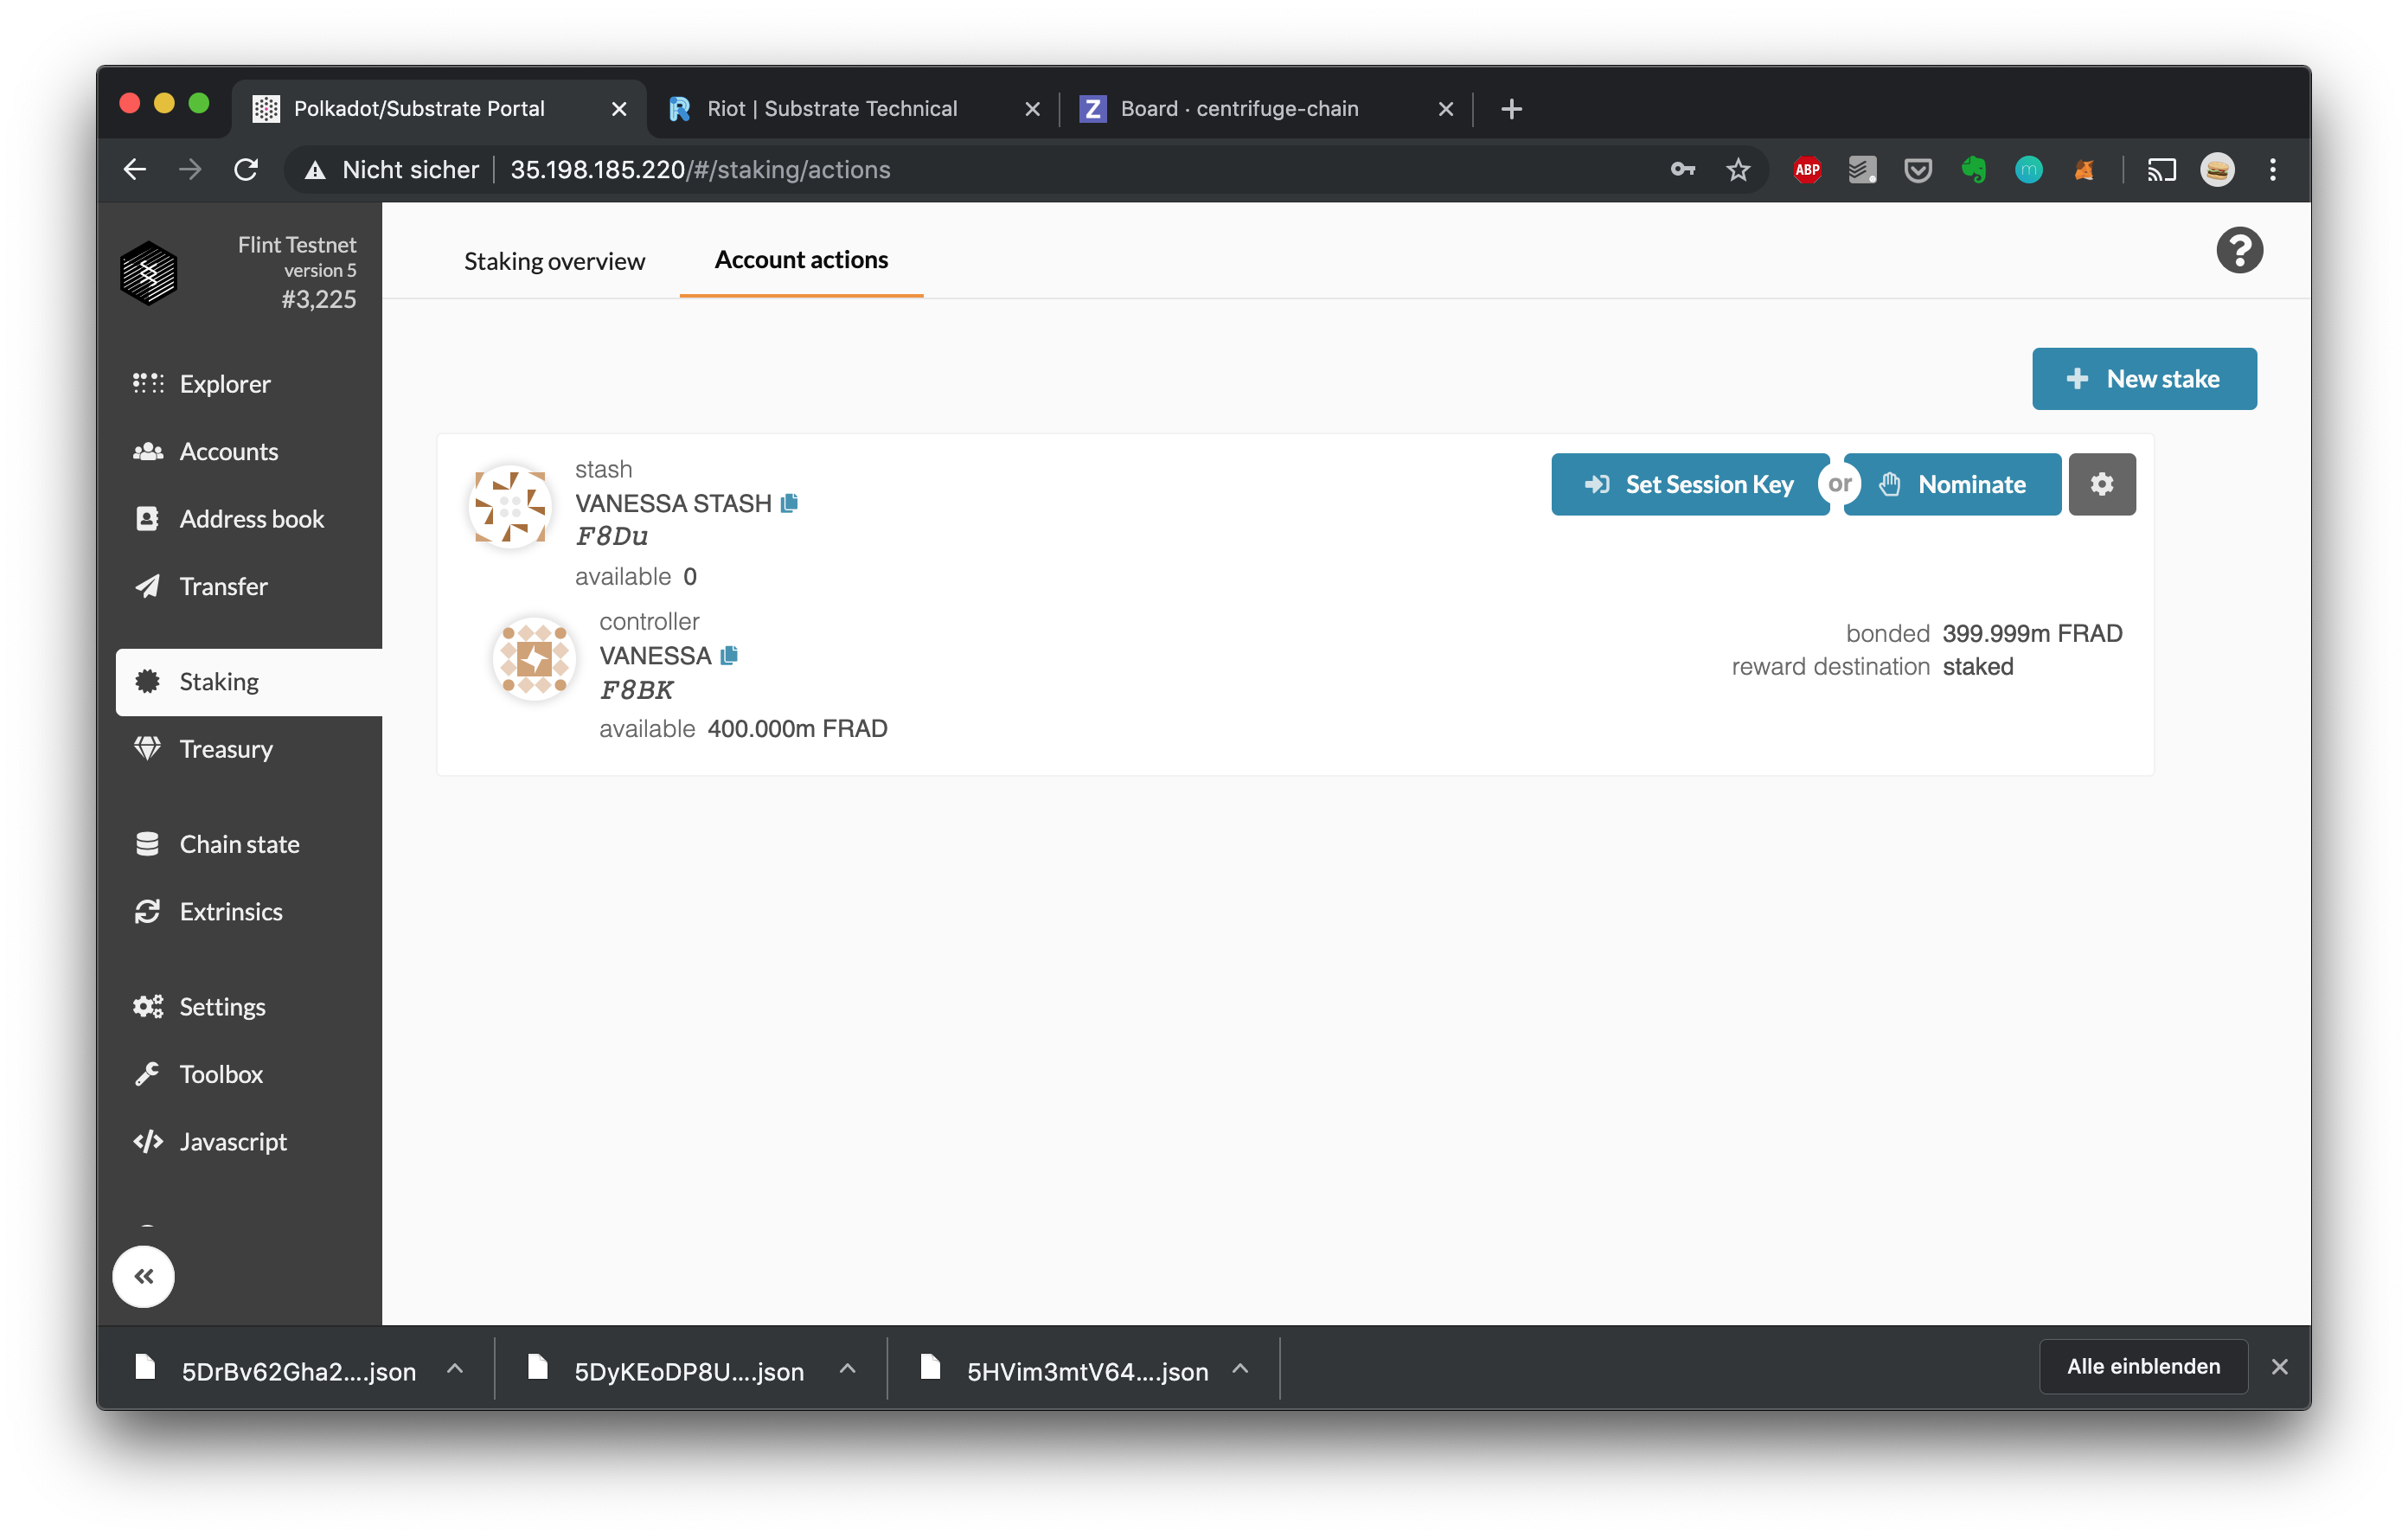 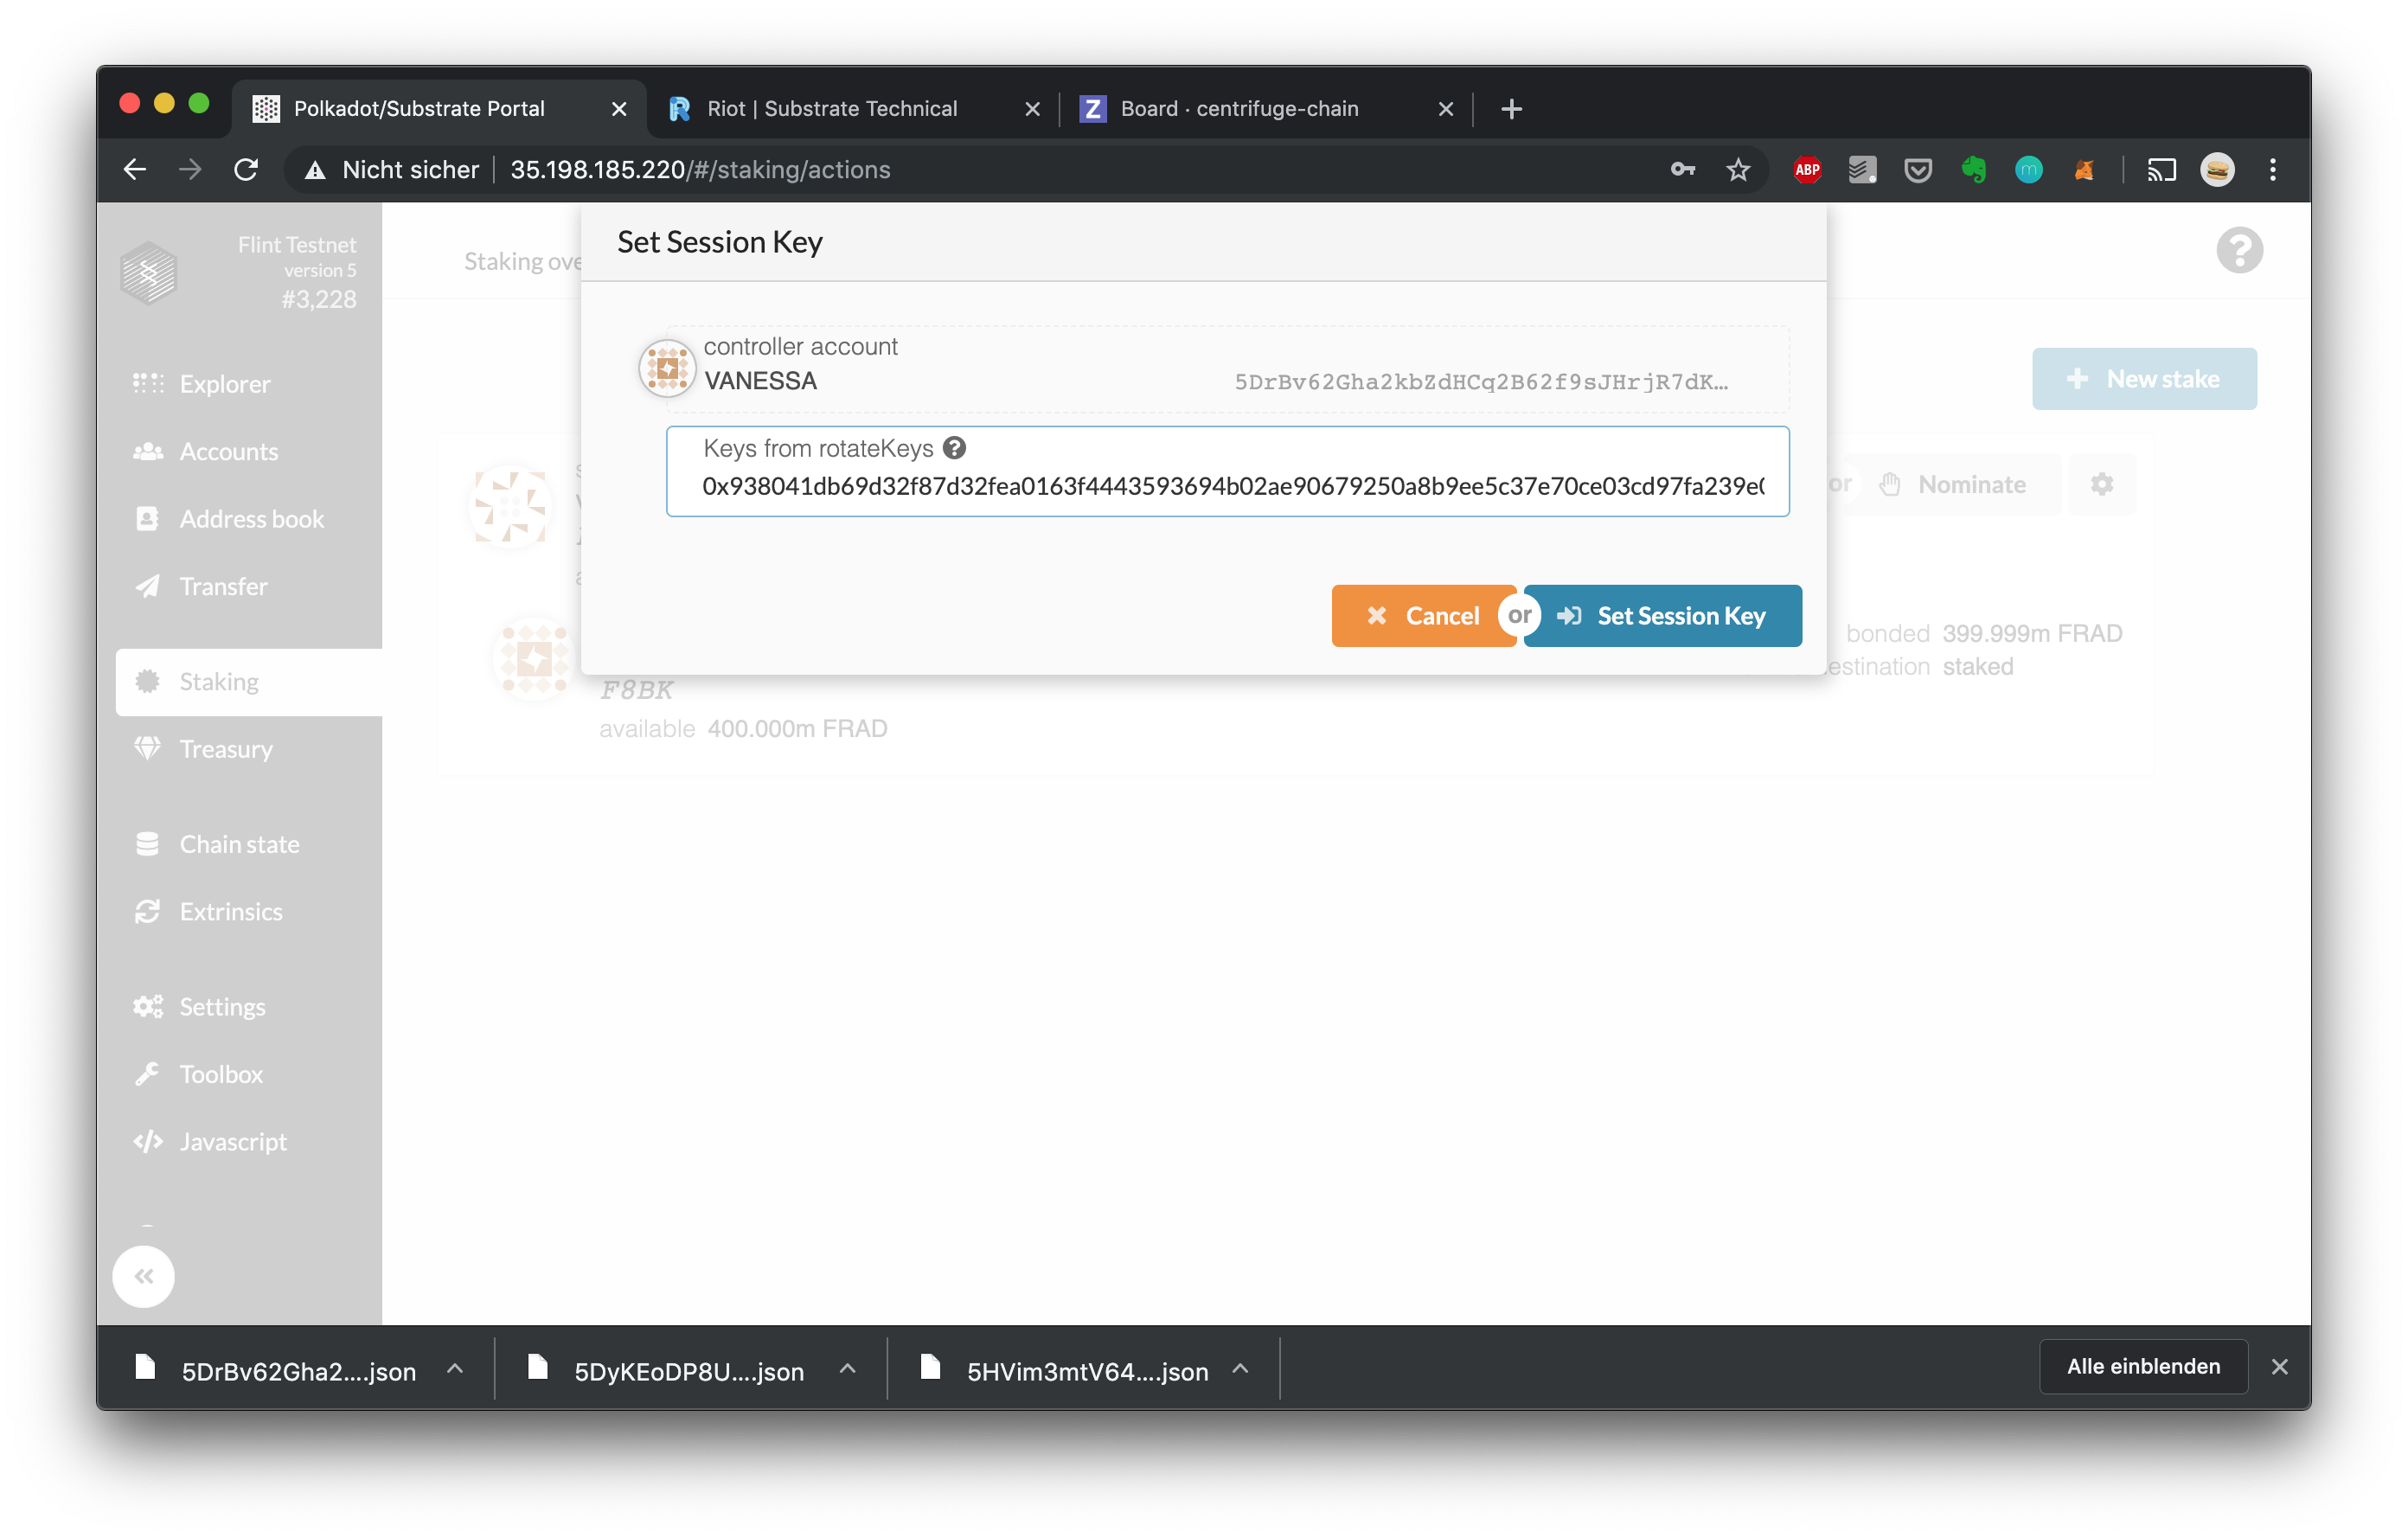
1. You are ready to start validating! Change your status to validating by clicking "Validate": 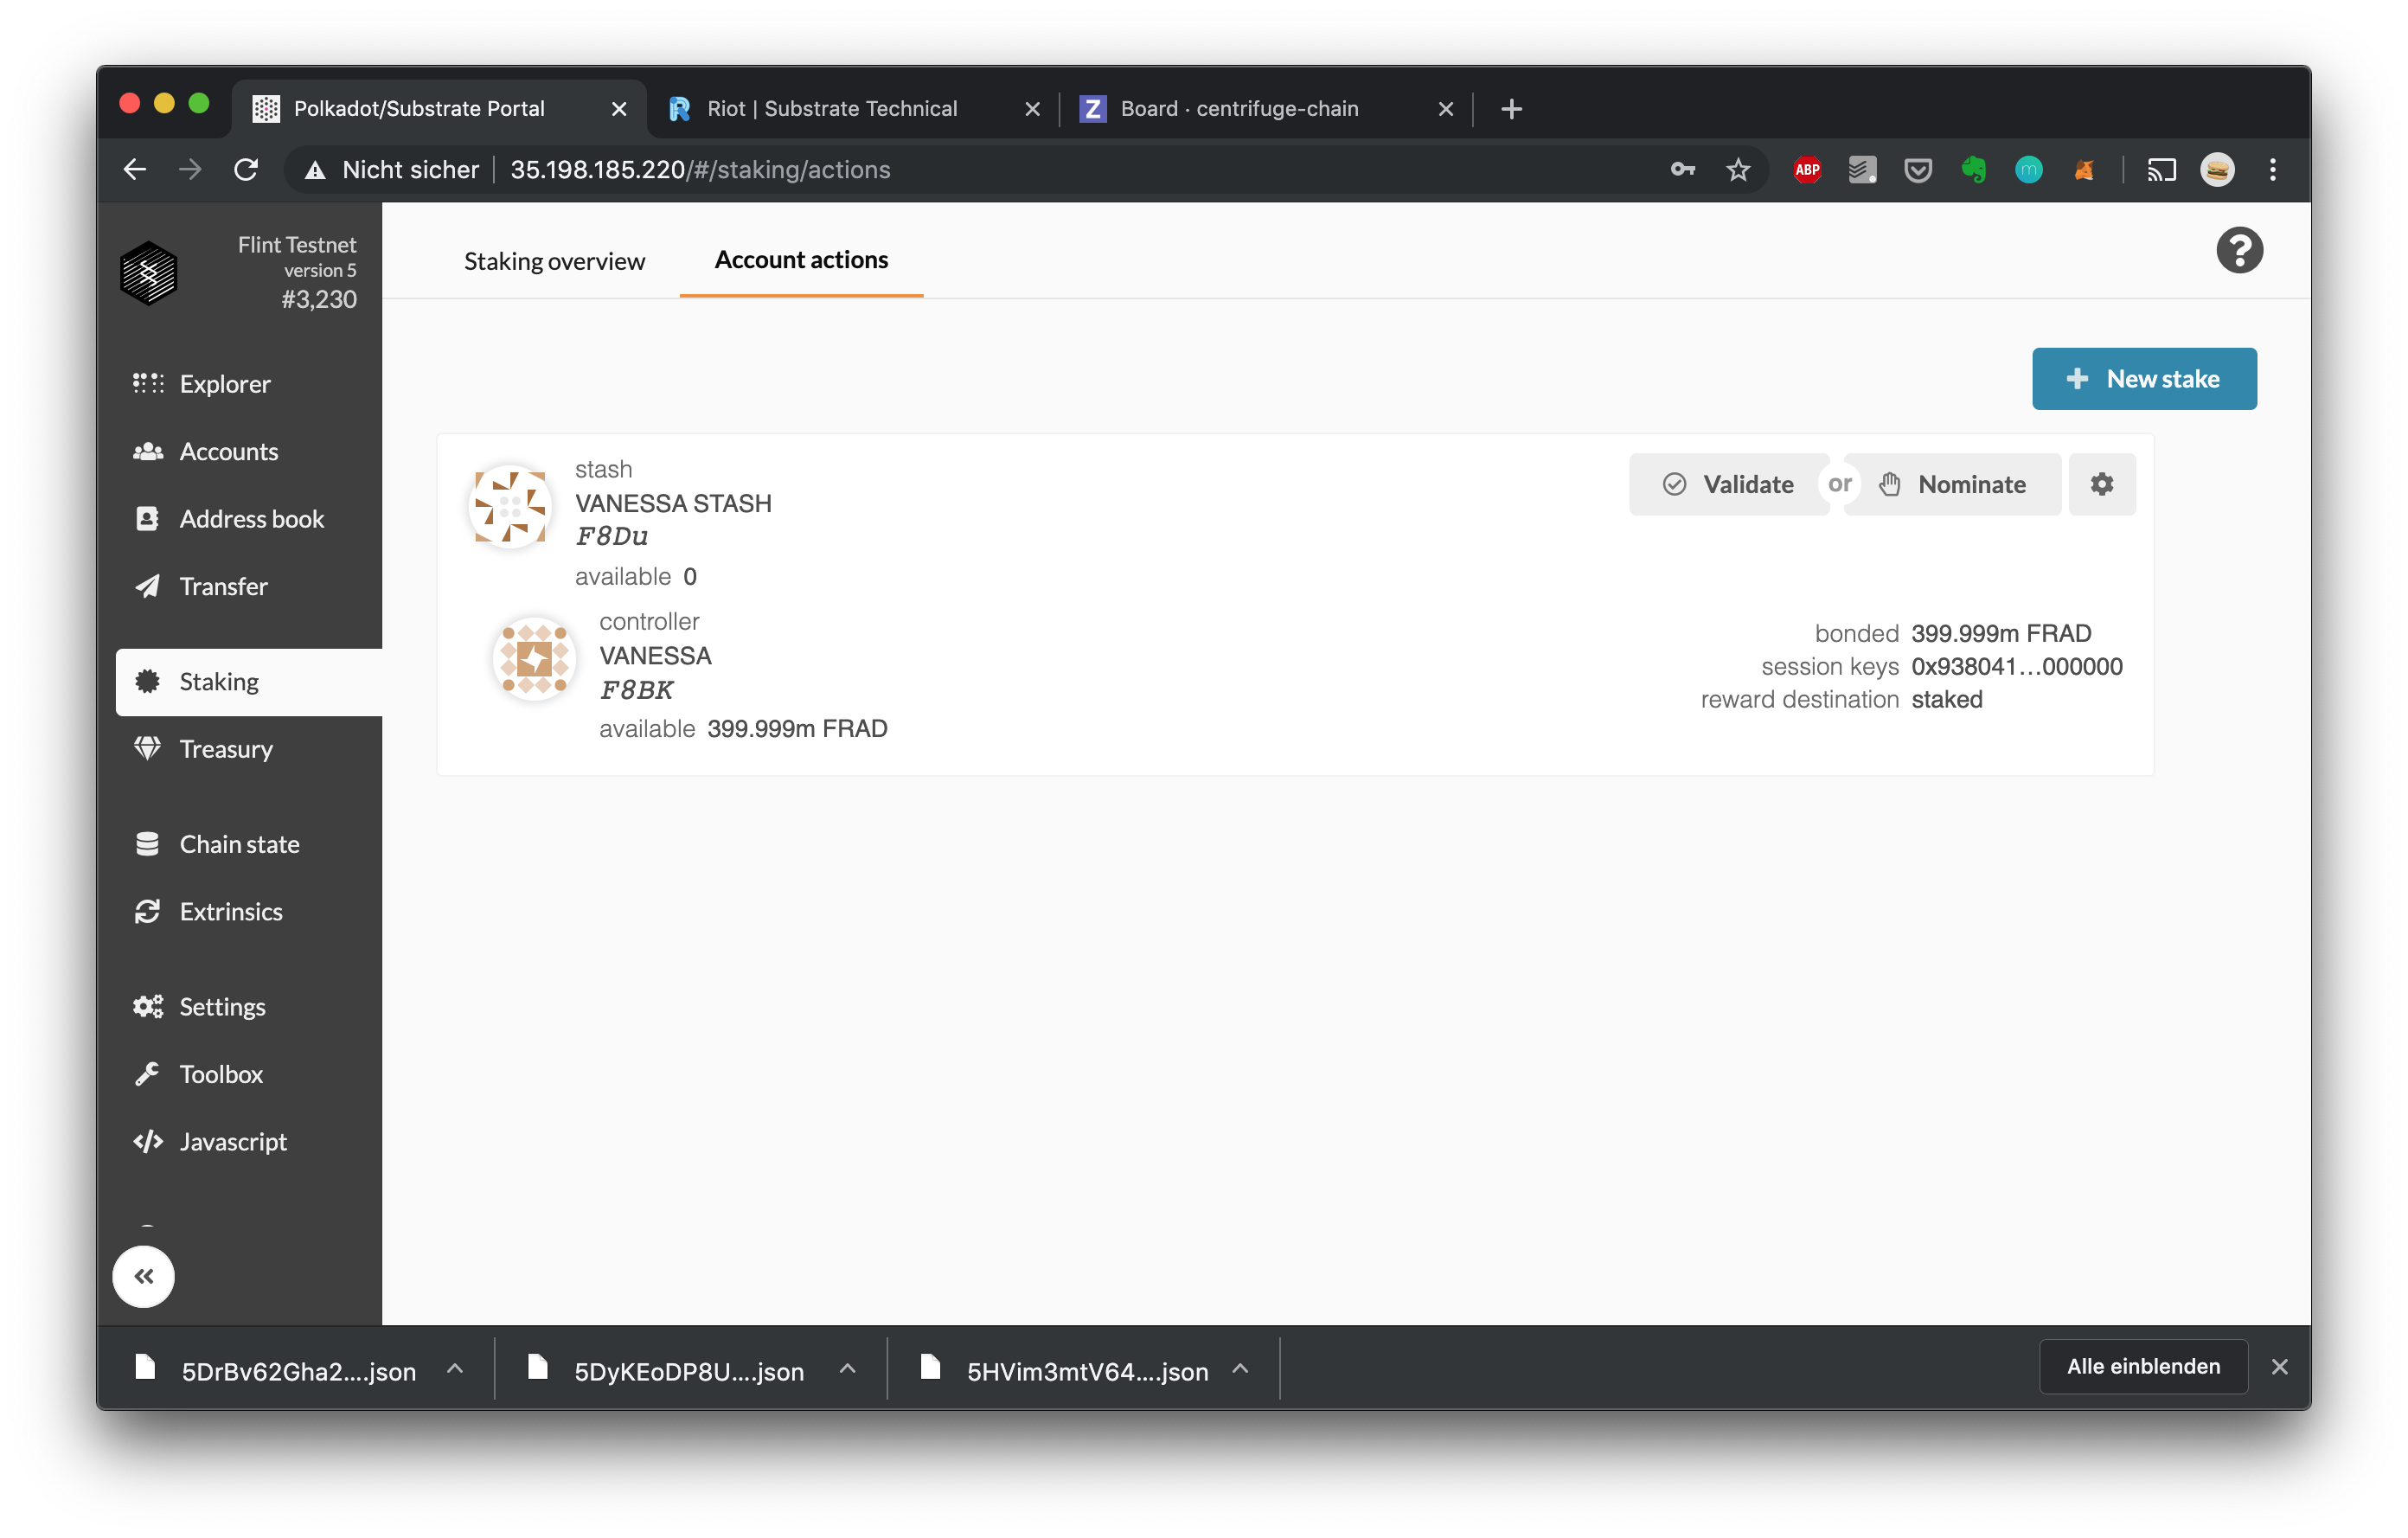 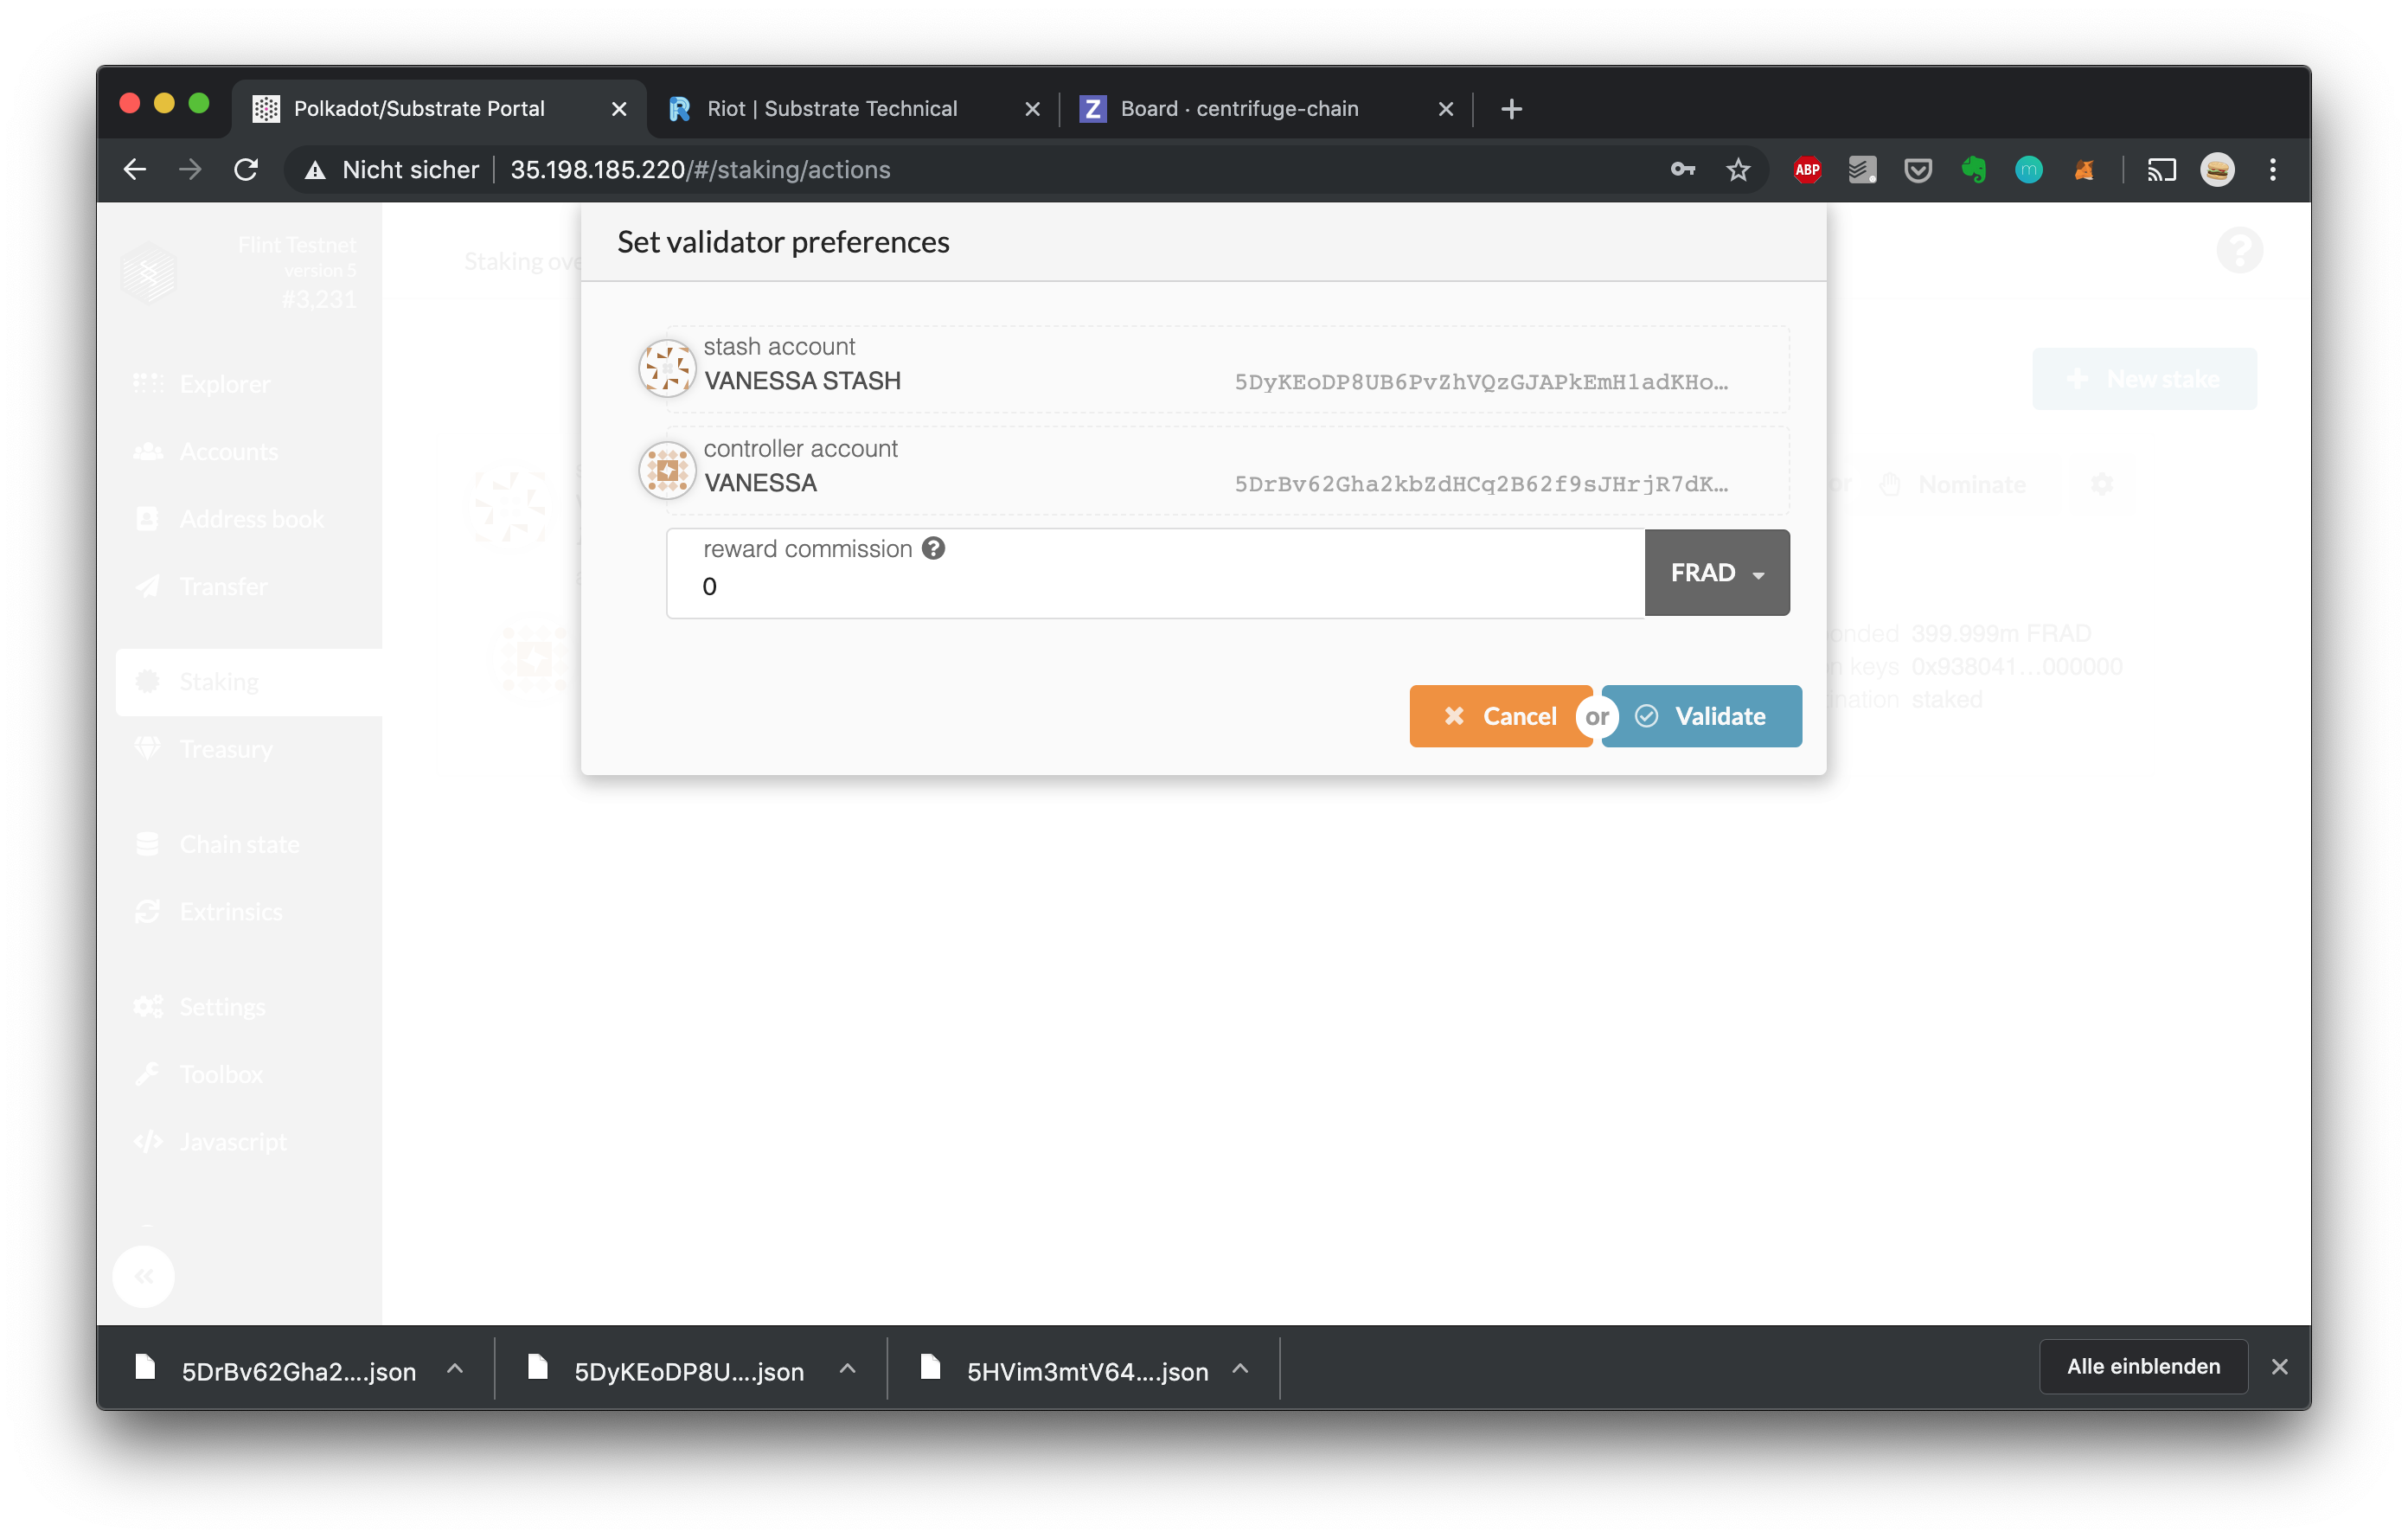
1. In the staking overview, you should now see your validator in the "Next Up" column:  If validator slots are empty or if your validator has a higher stake bonded then an active validator, it will enter the validator set at the next era change (at most in 24 hours on Amber/Flint): 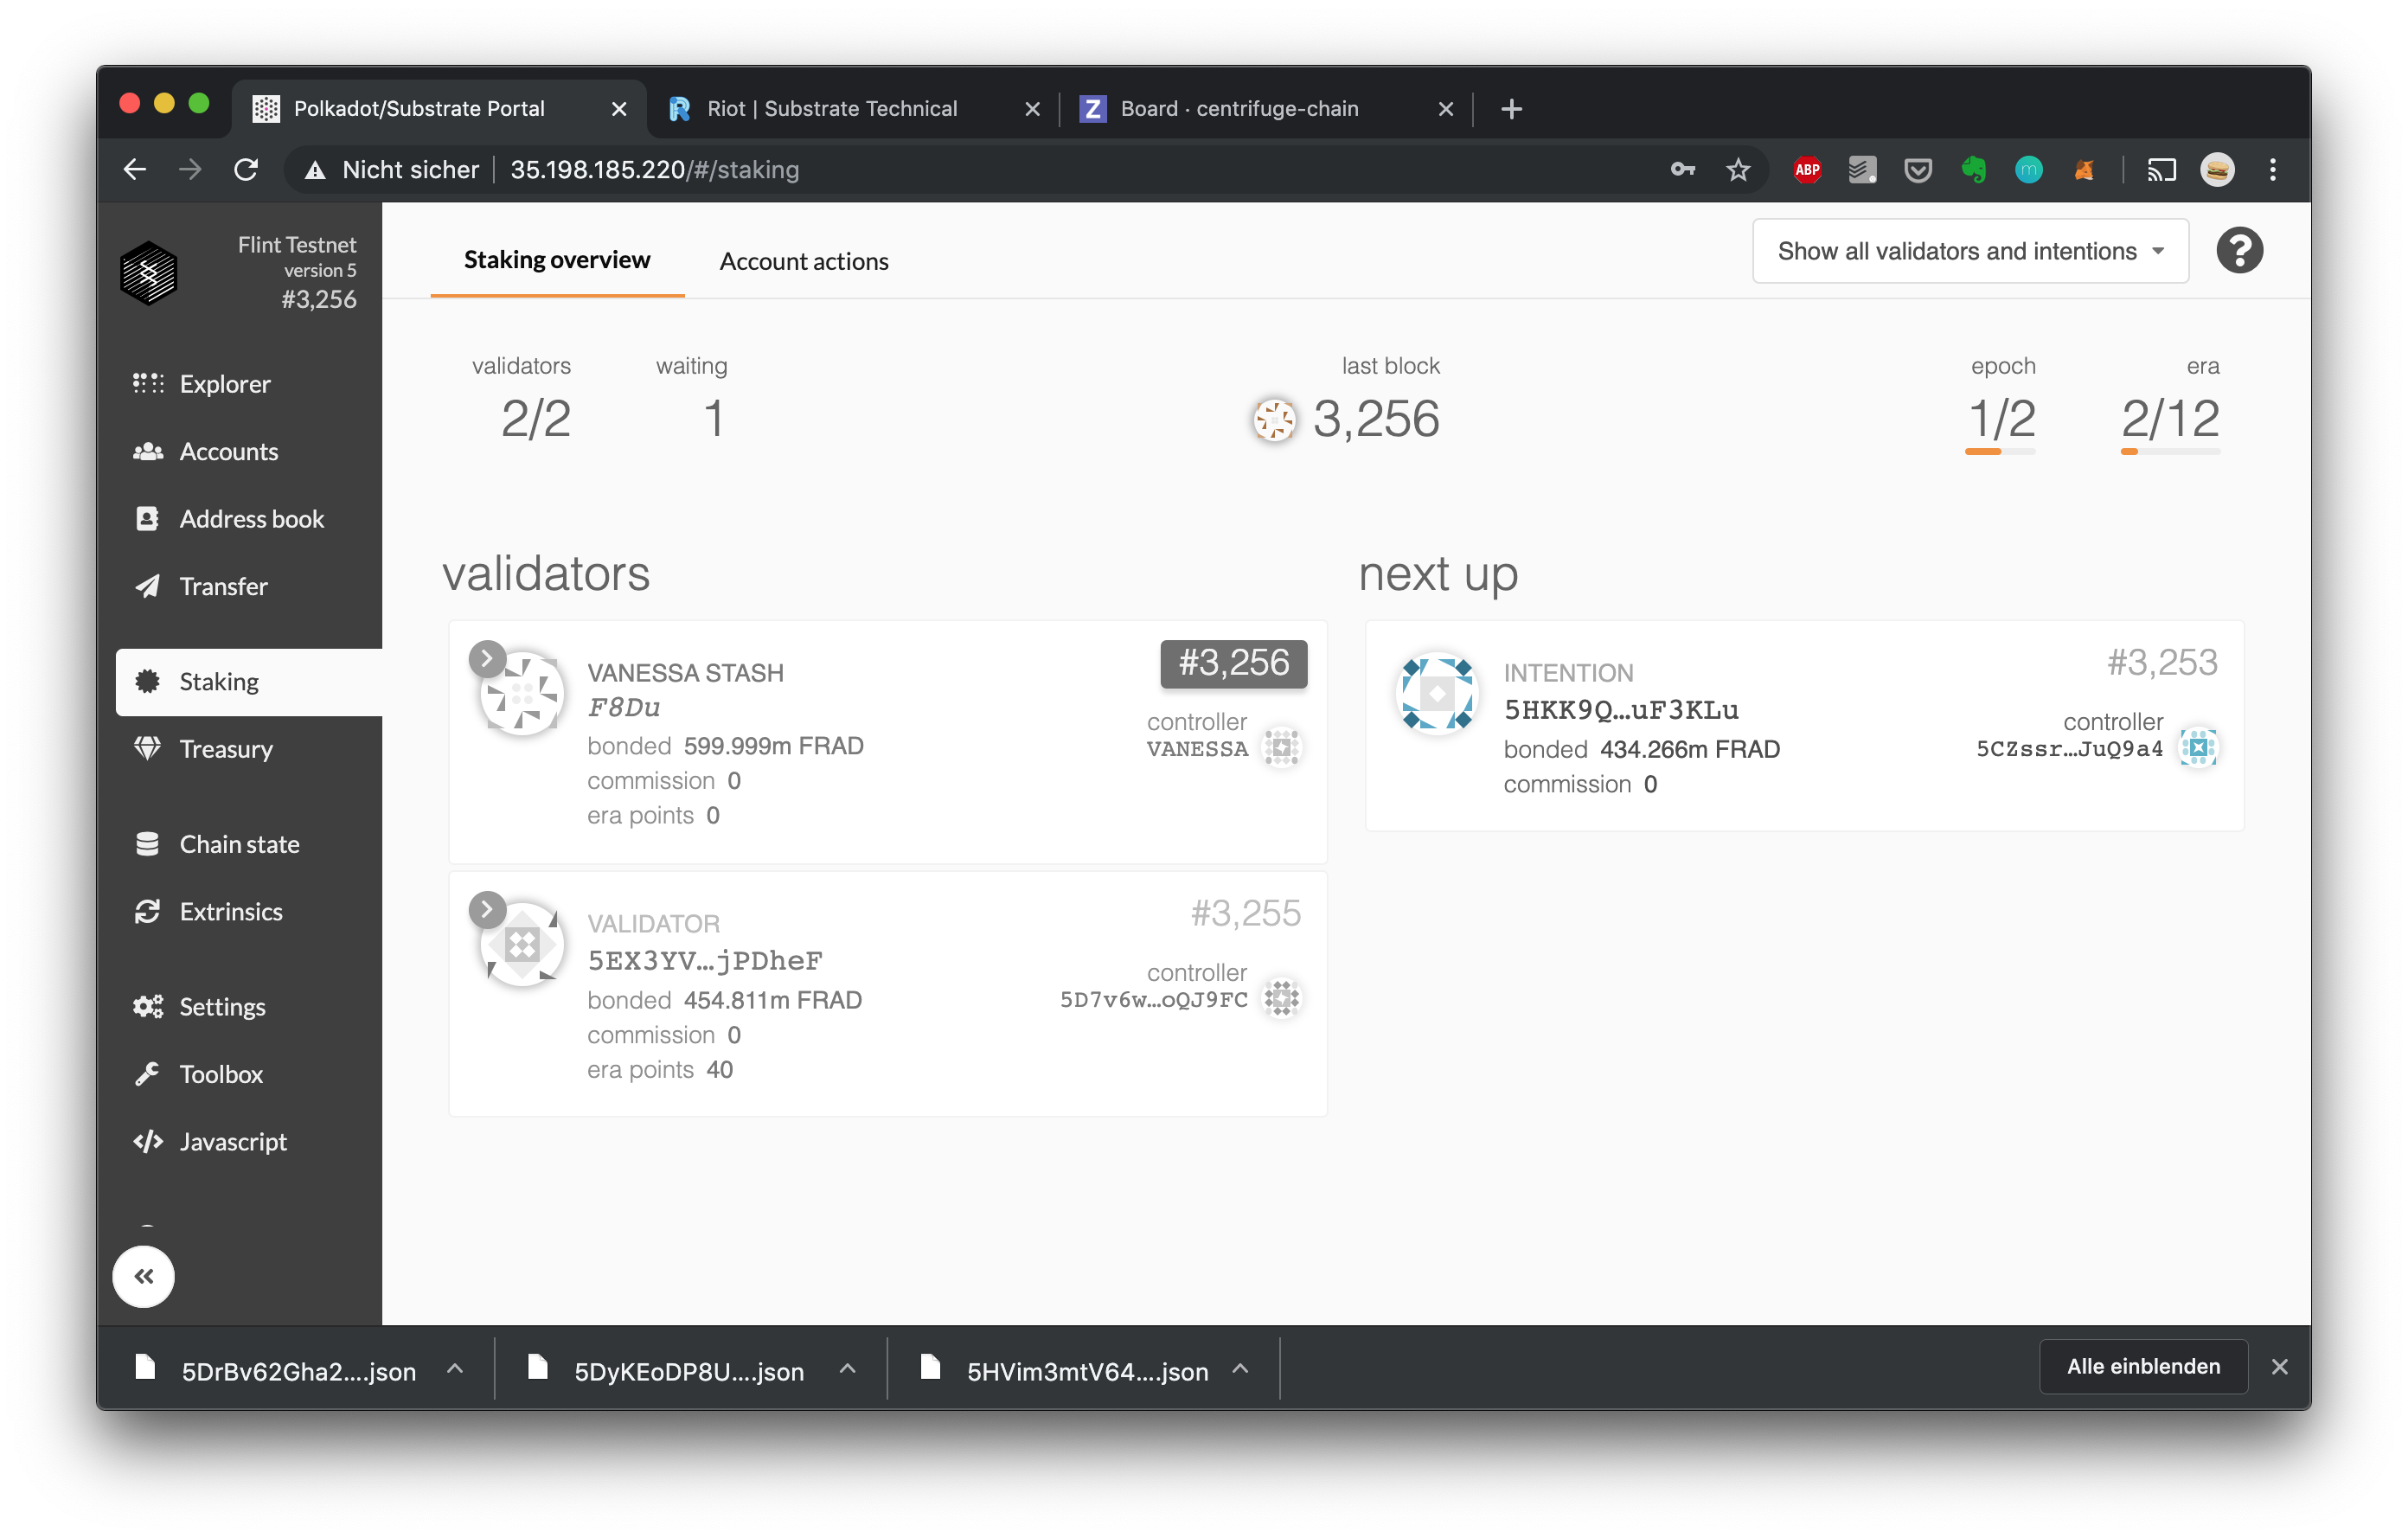
1. All done! If you want to stop validating, head back to "Account actions" and click "Stop Validating" 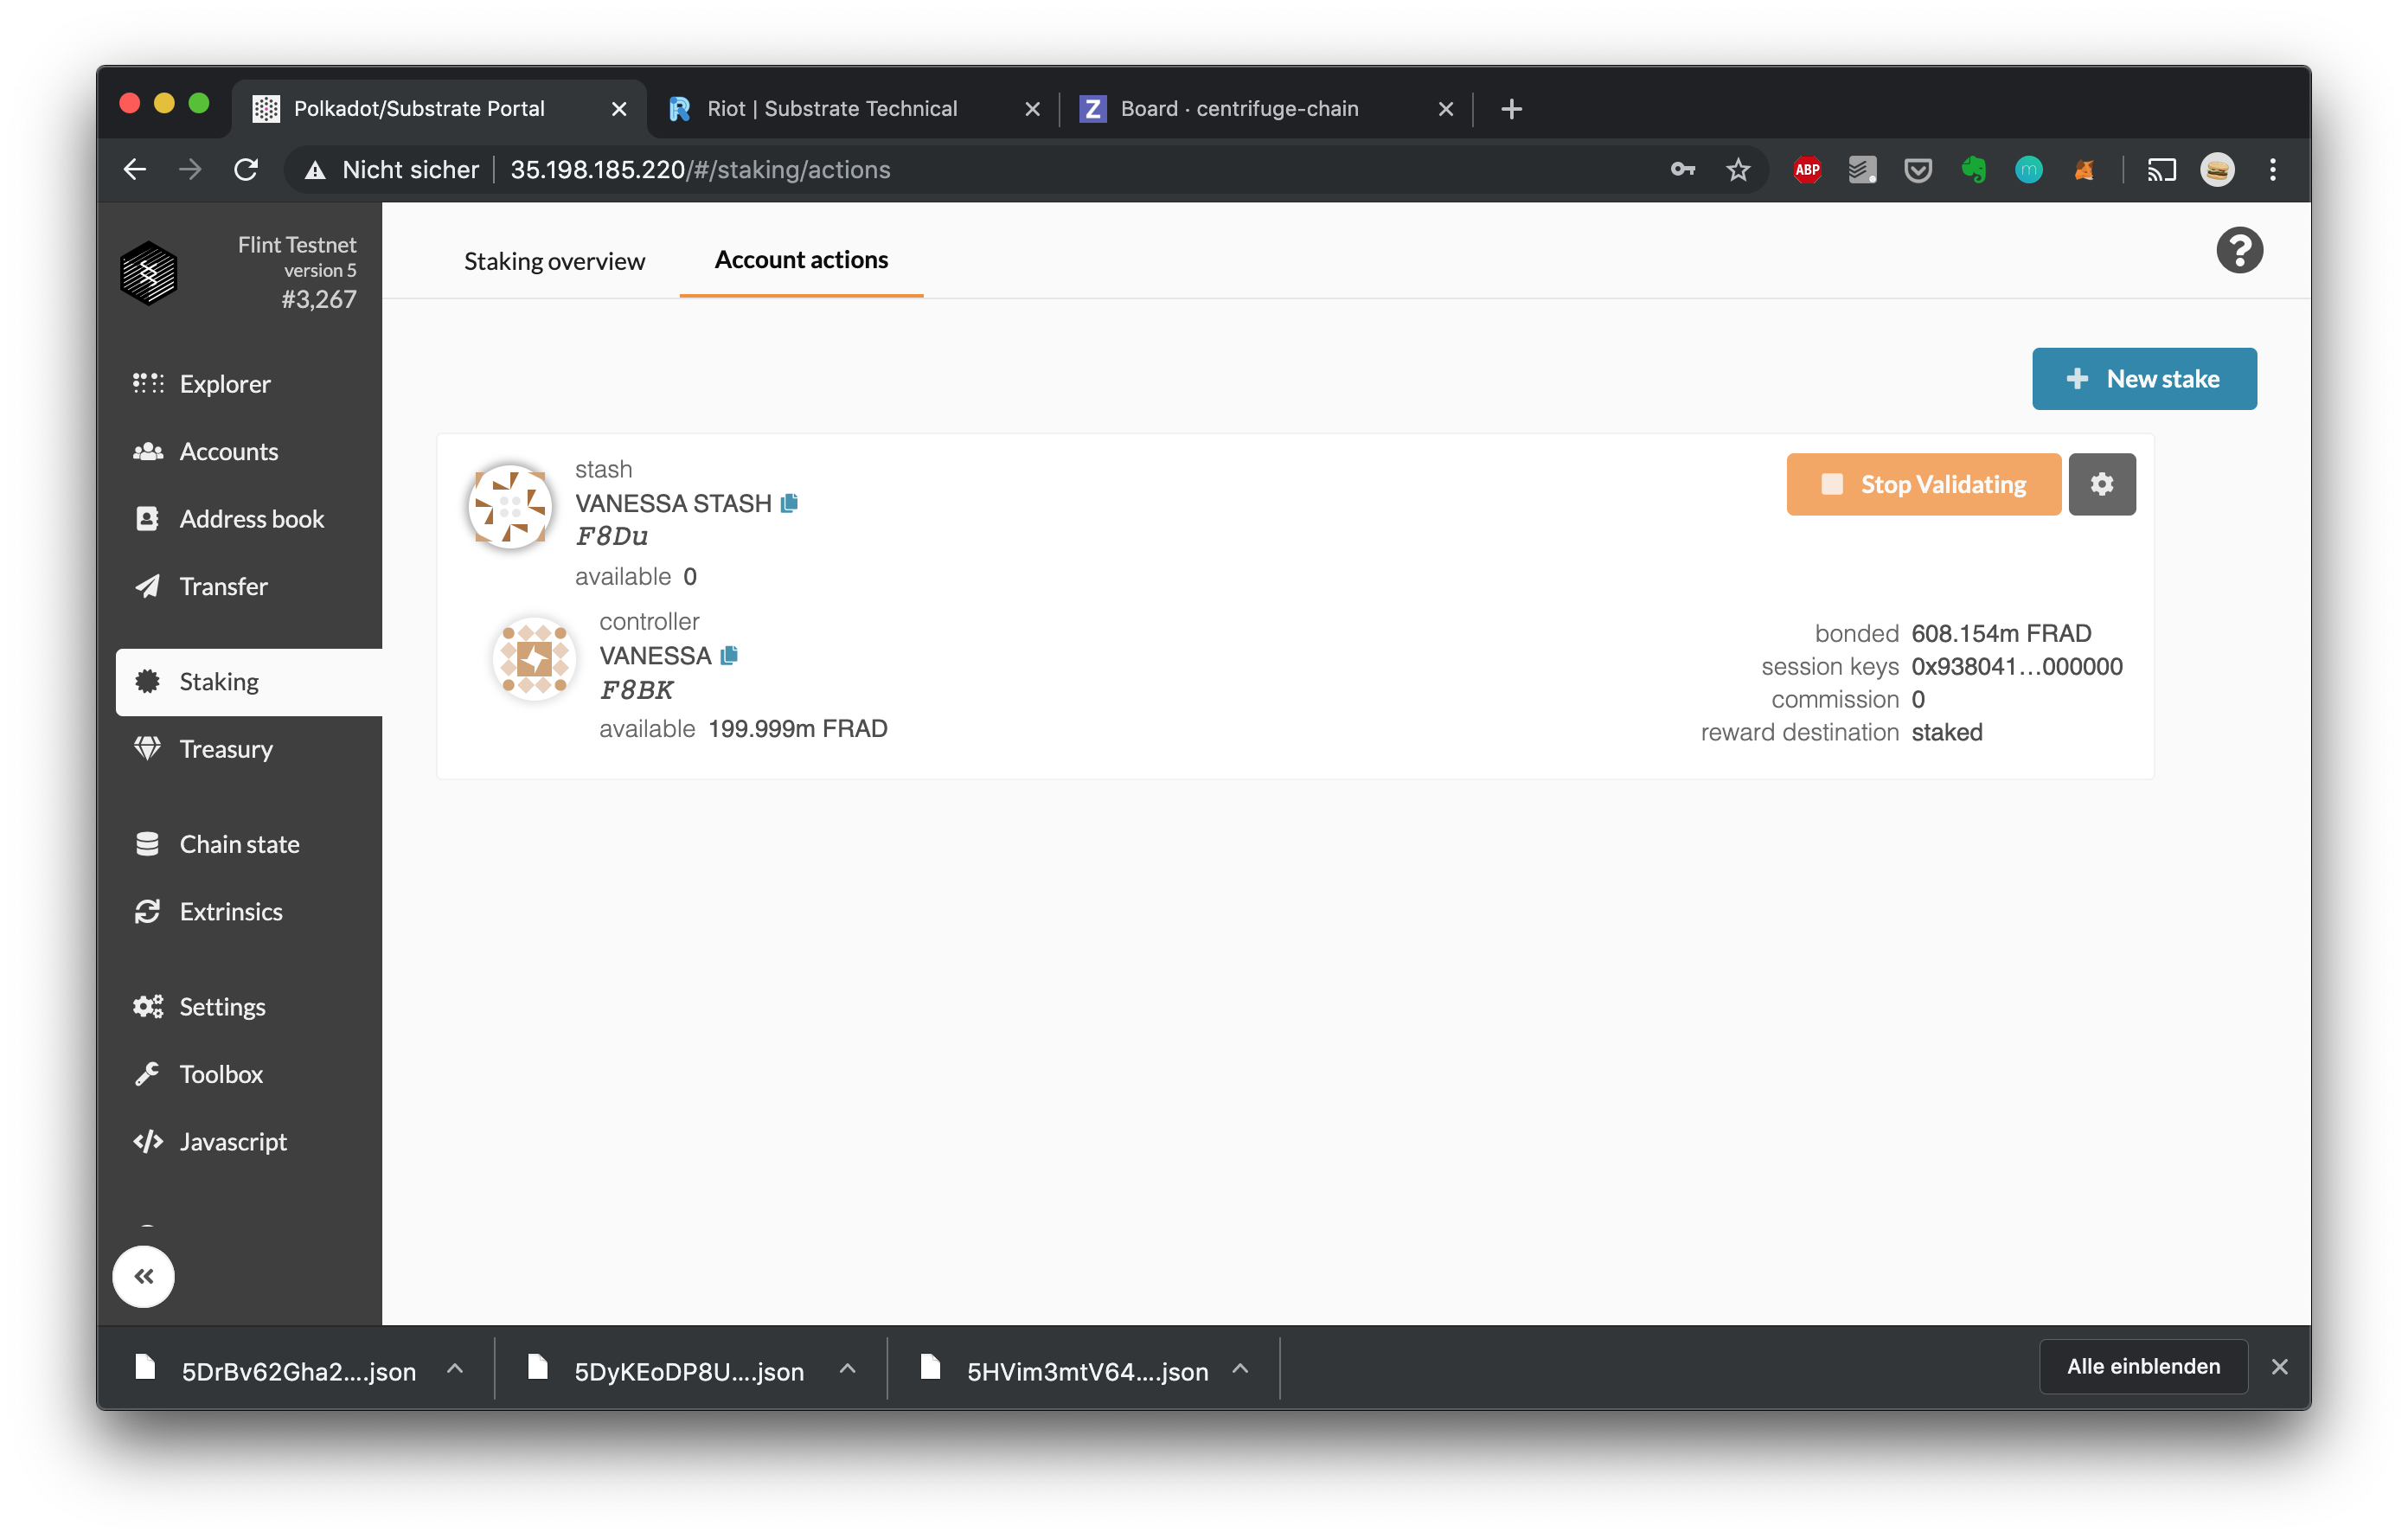 You should now see that your validator is no longer selected for the next era (at most in 24 hours on Amber/Flint): 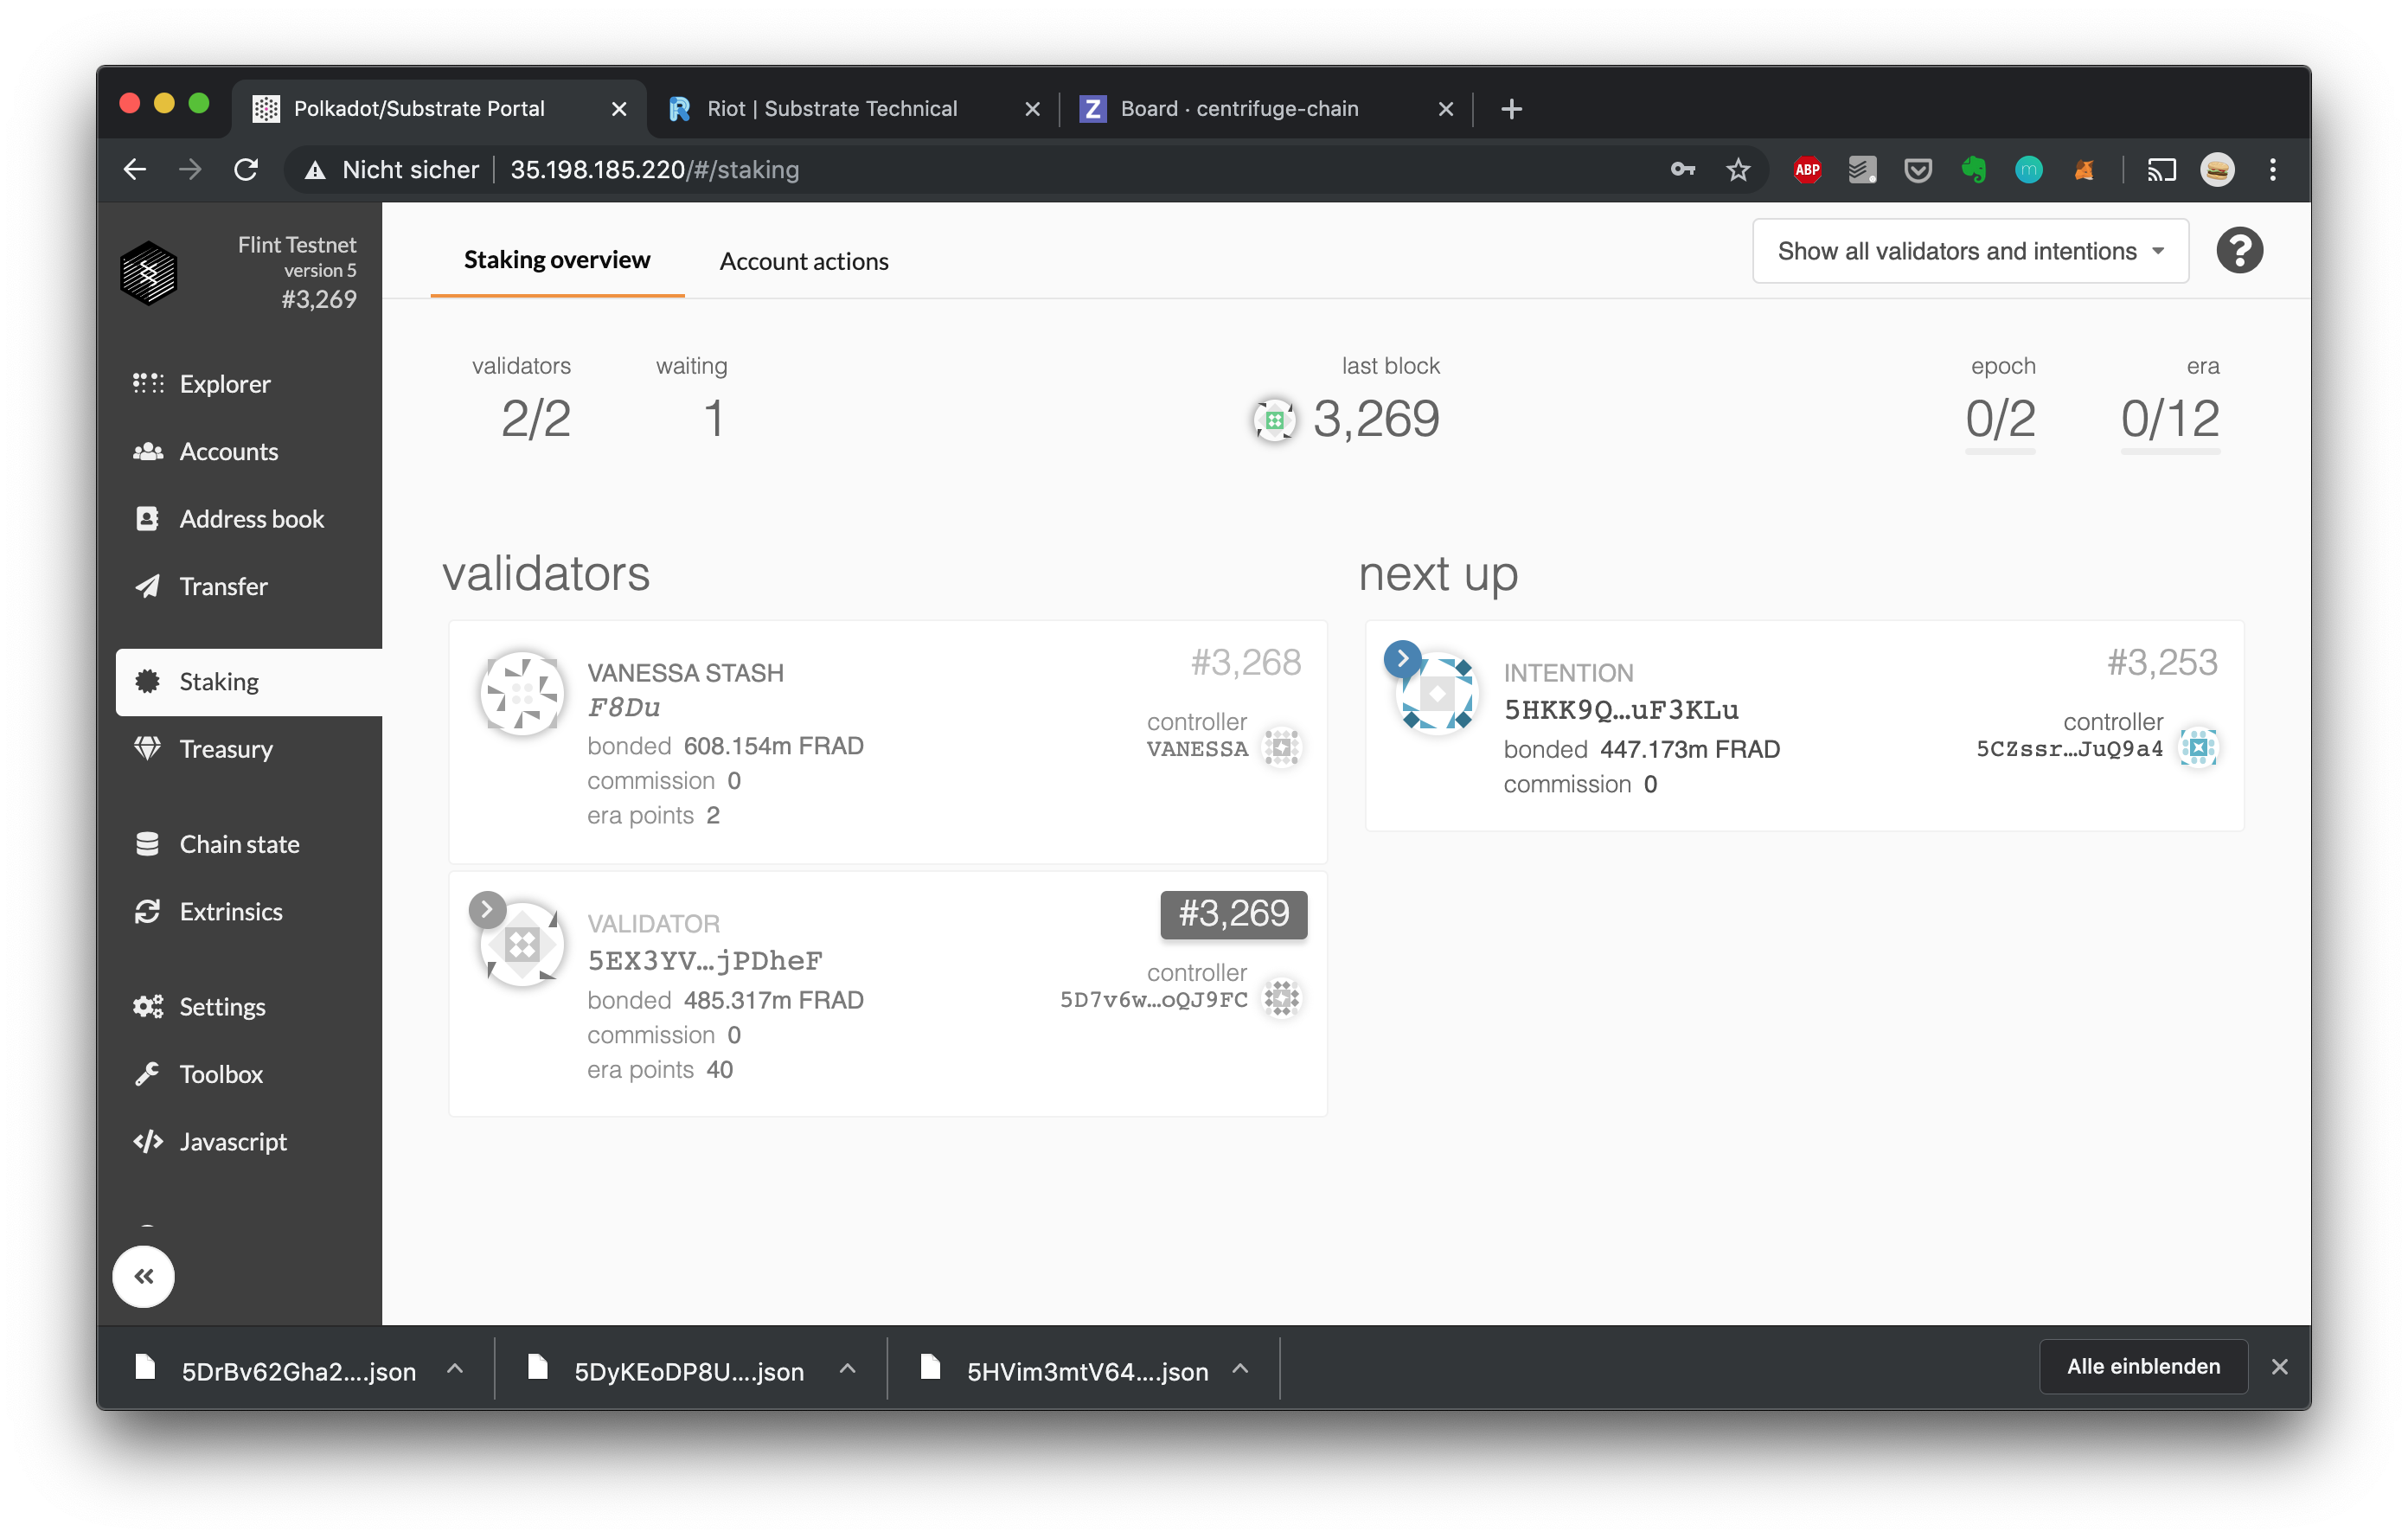 After the next era change, your validator should go back to idling and no longer show up in the Staking overview: 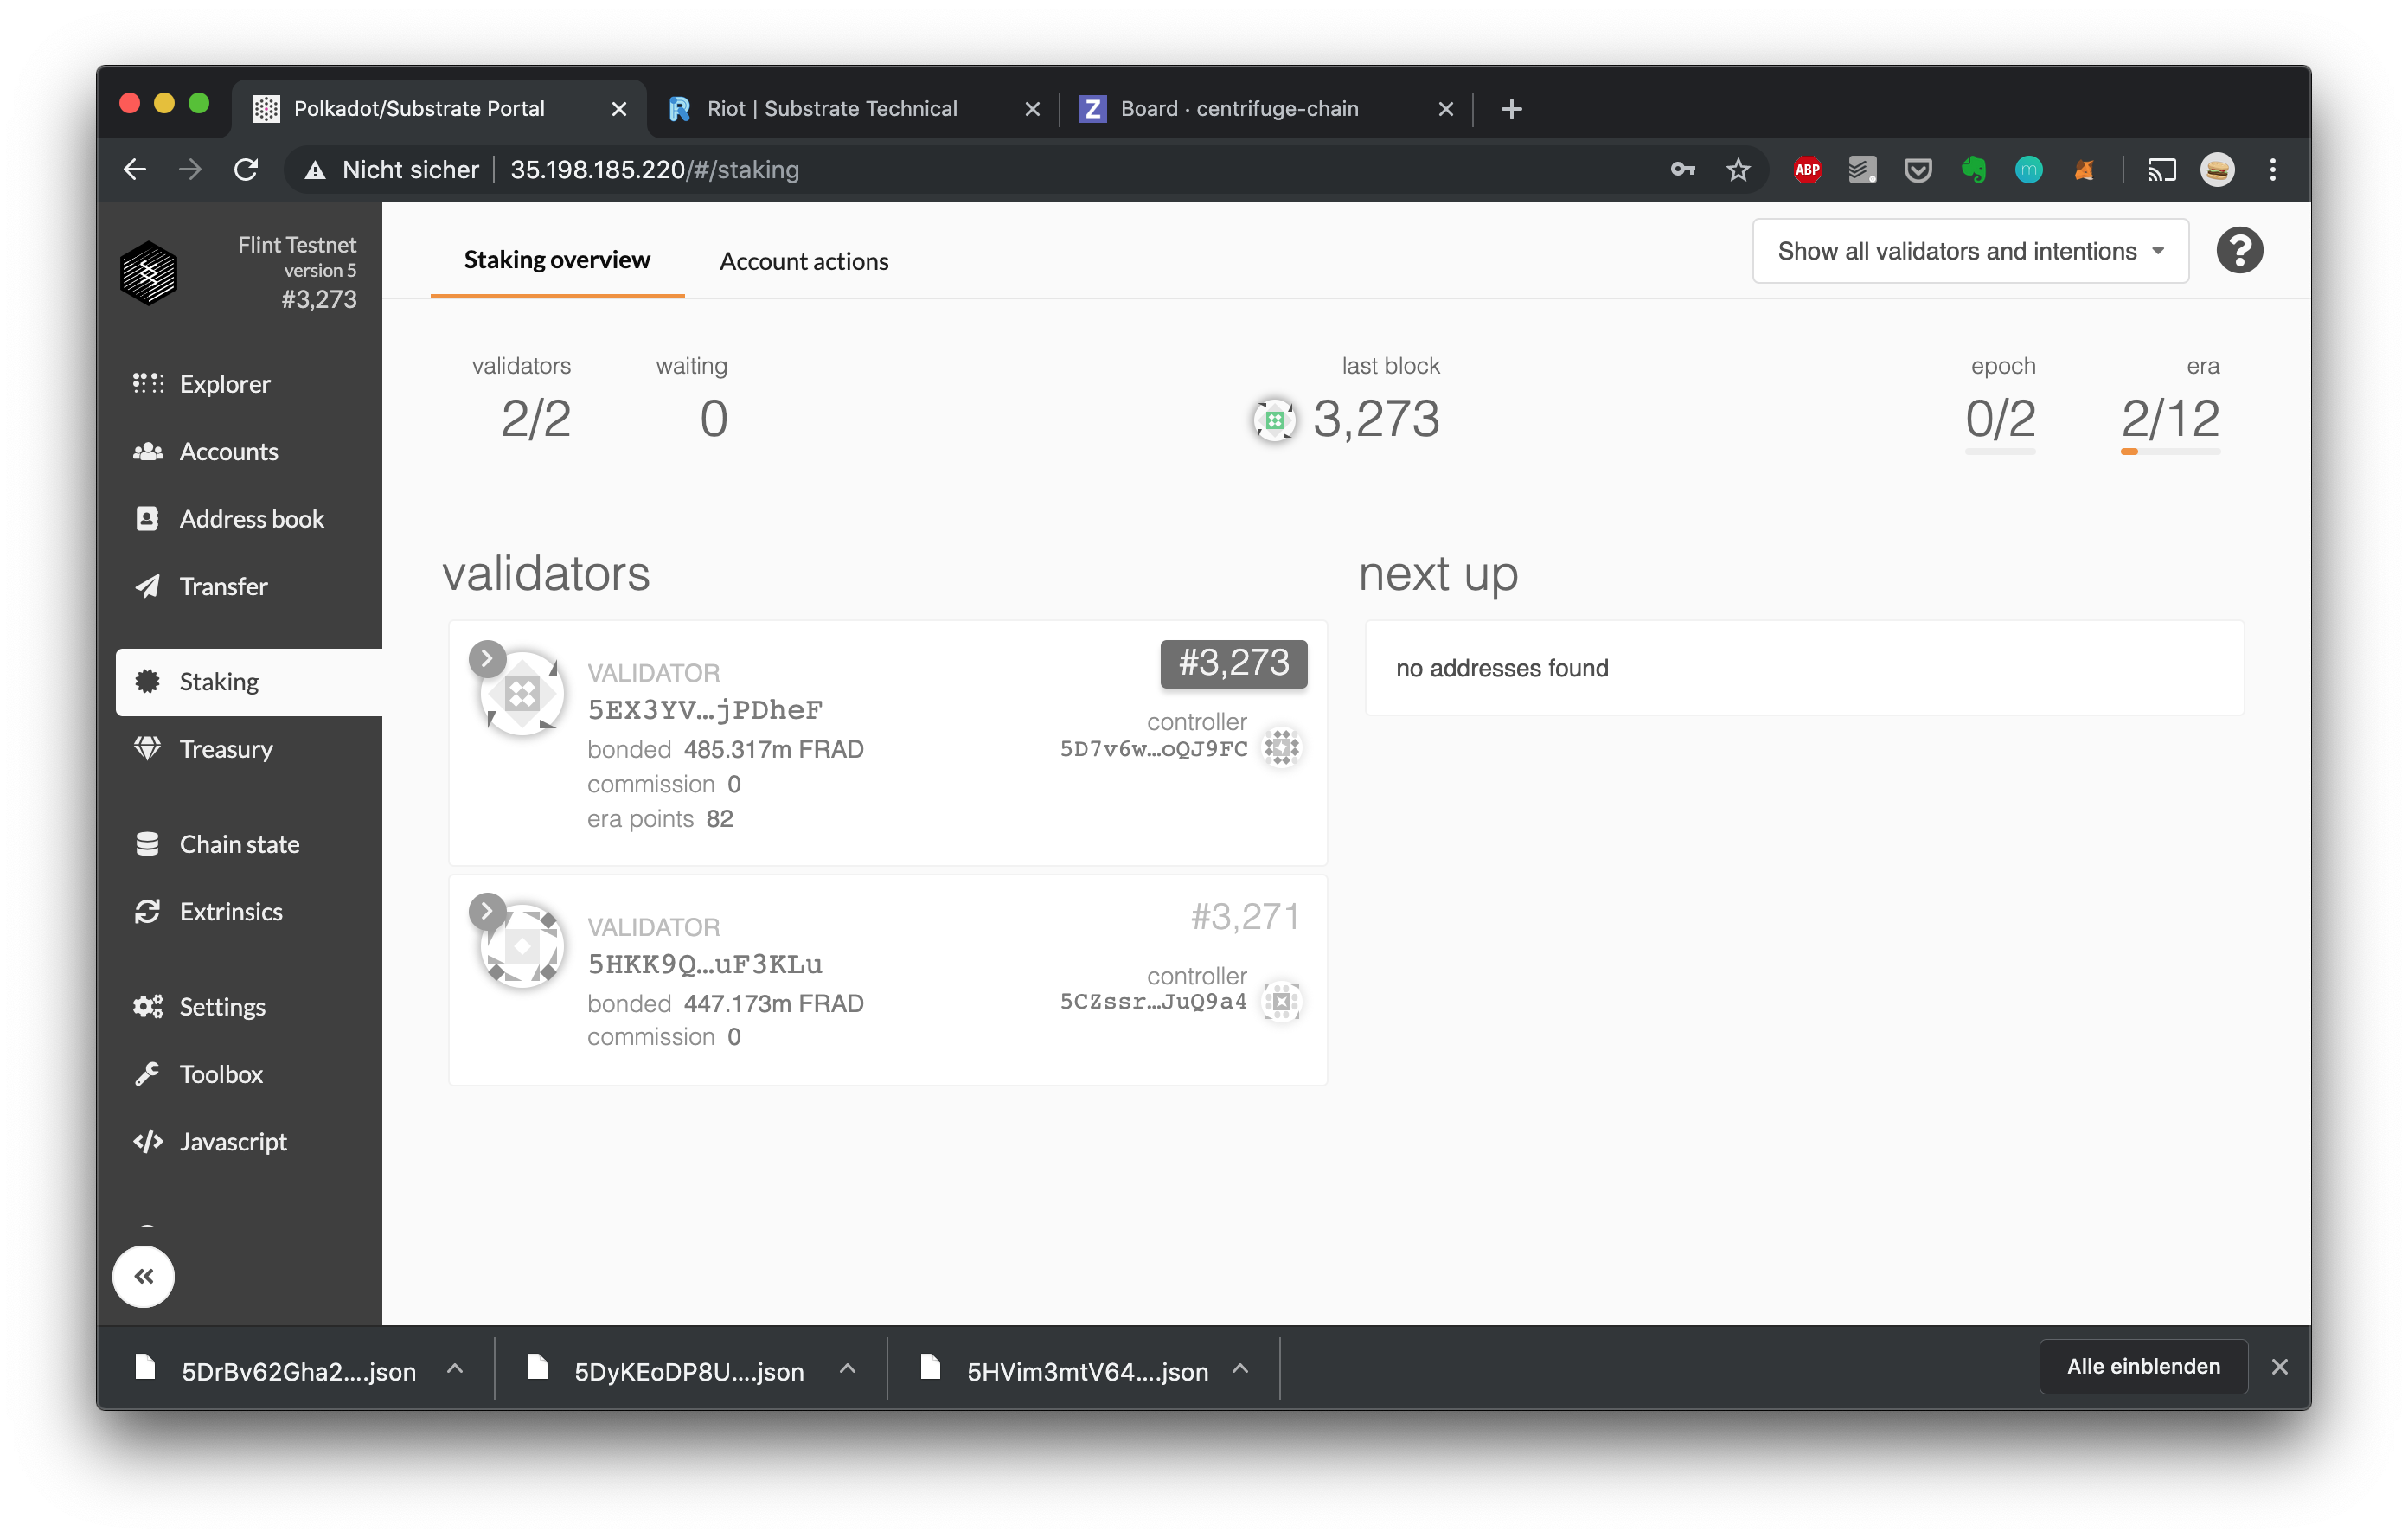
## Beyond this guide
Checkout the documentation for Kusama (Polkadot's exeprimental testnet), which is highly applicable to Flint: https://guide.kusama.network/en/latest/try/validate
## Production grade setup
Additional resources on how to run a production grade validator on a Substrate based chain can be found at https://github.com/w3f/polkadot-secure-validator. The guides by Certus One (Cosmos Validator) can be a valuable resource as well: https://kb.certus.one/.
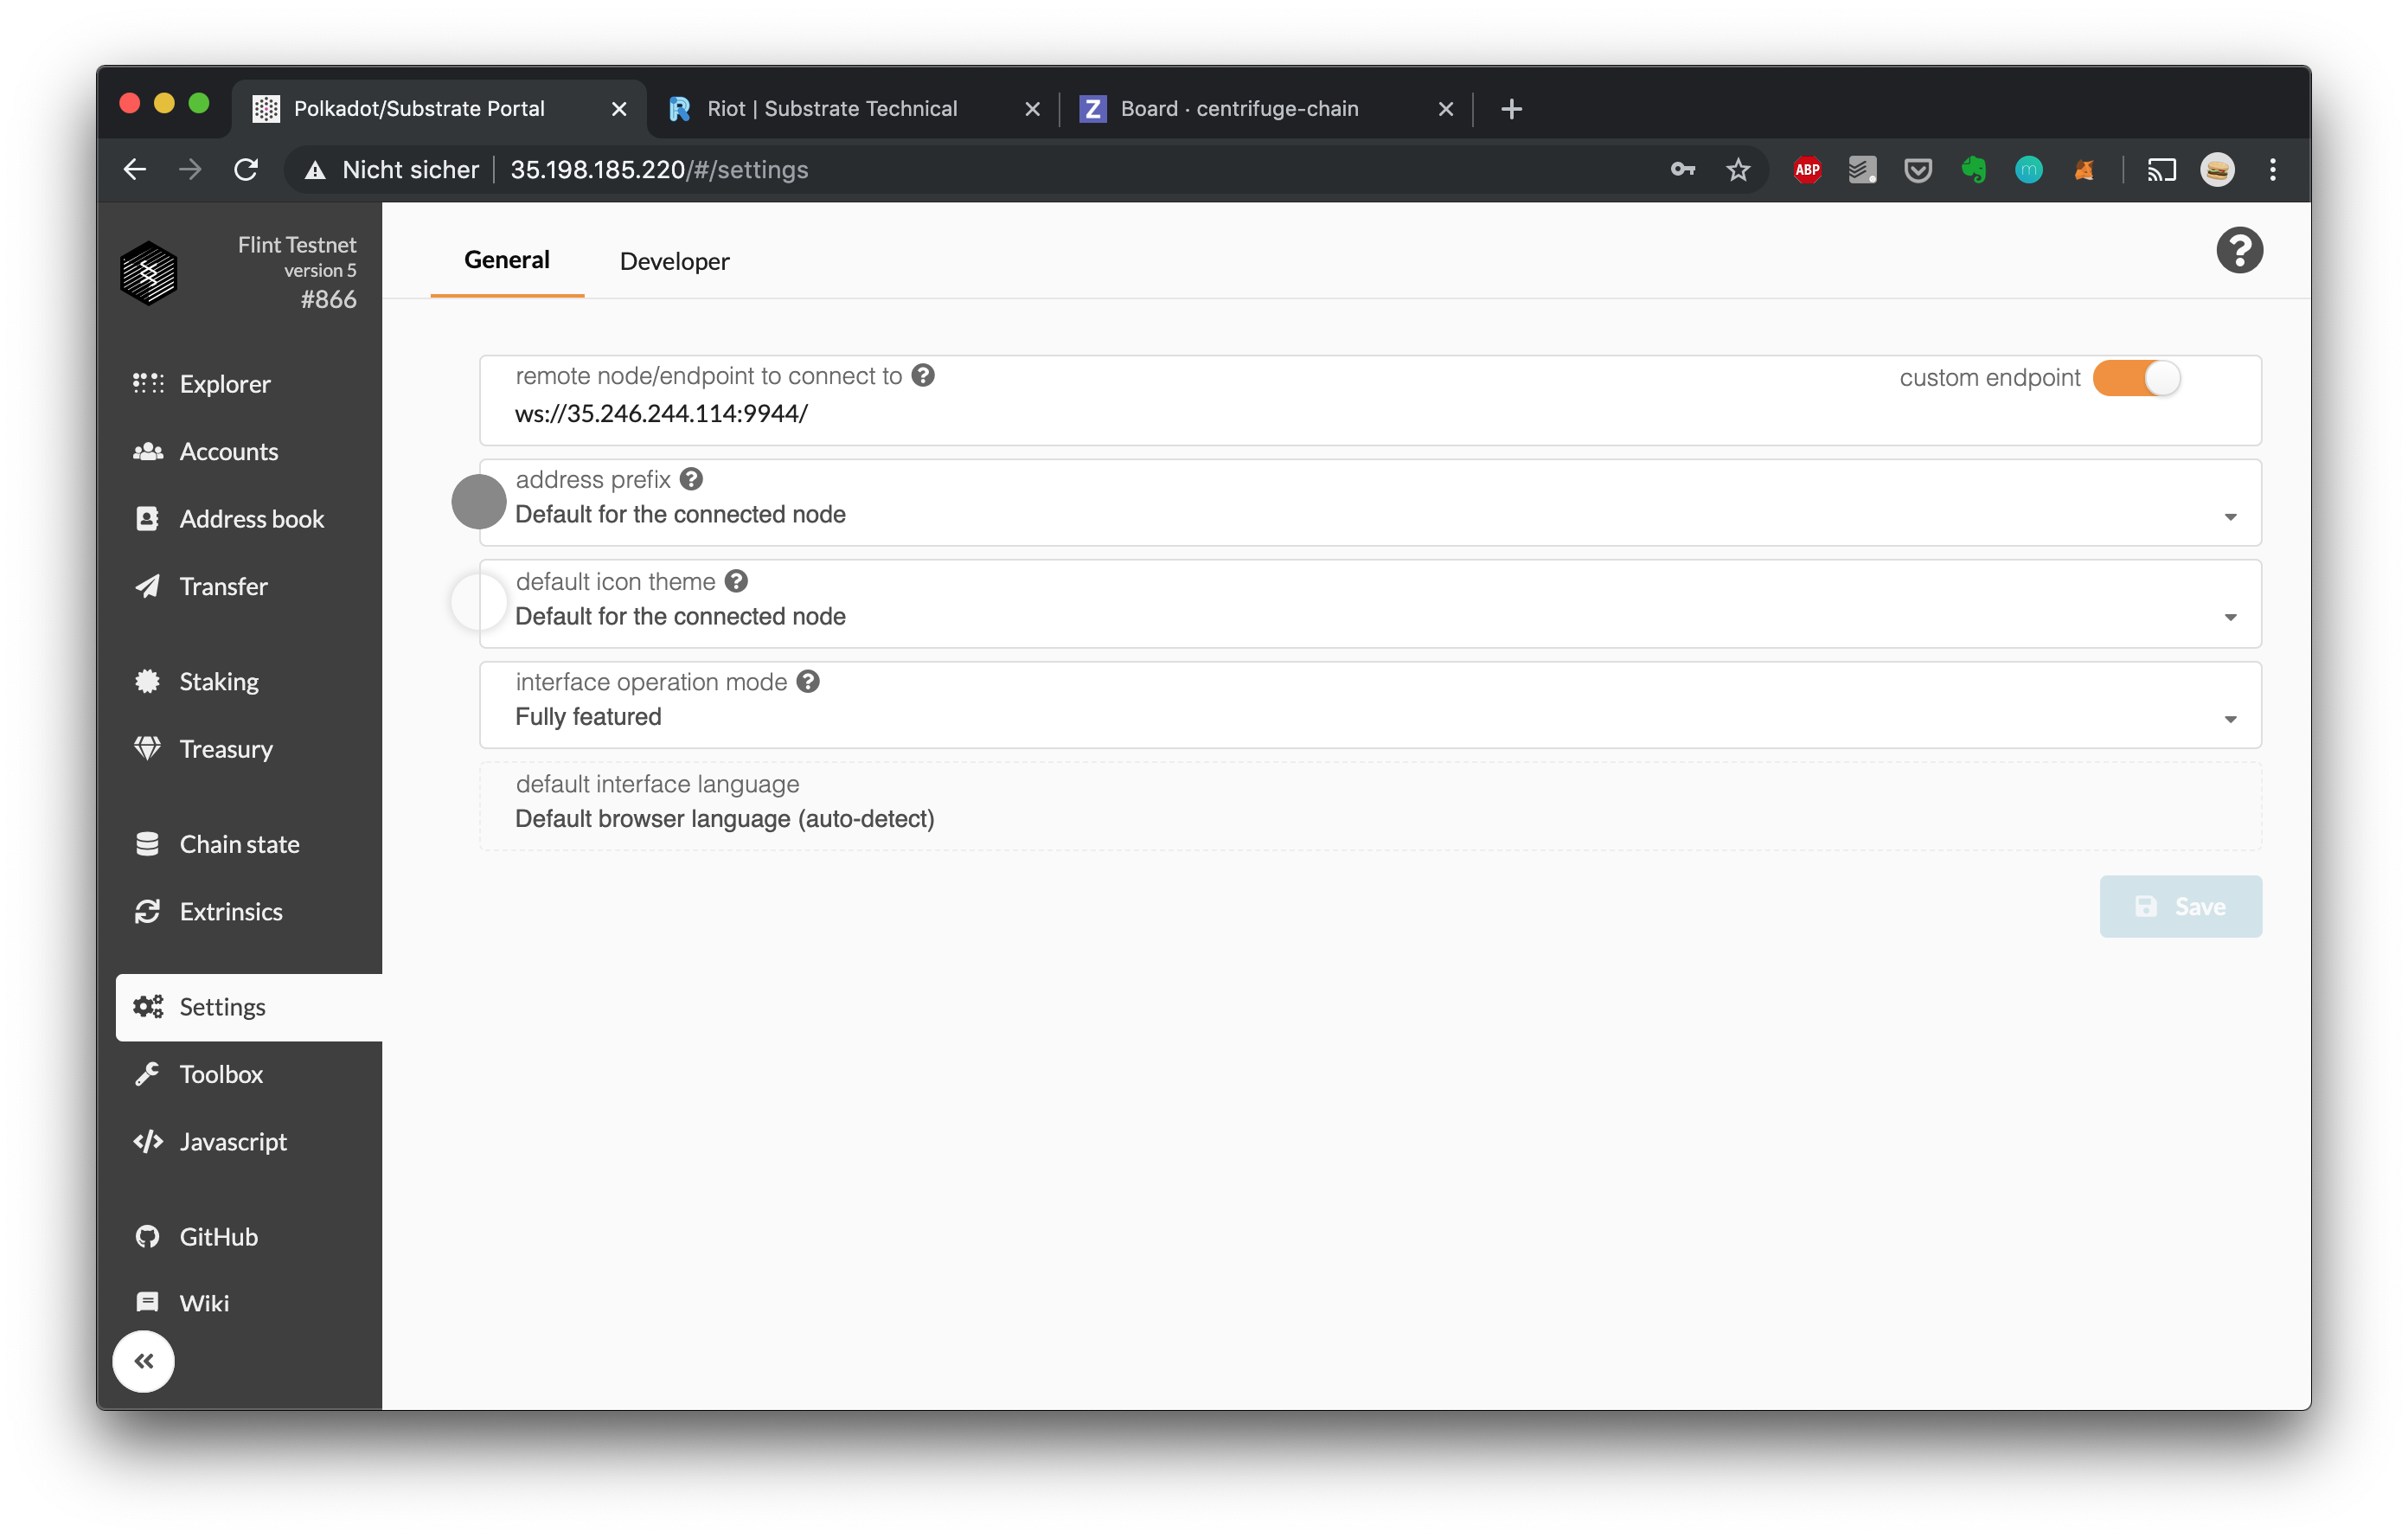
## Manually point the Portal to the Amber or Flint Testnet
To manually point the Portal user interface to Flint, navigate to the Settings page at https://portal.chain.centrifuge.io/#/settings and set
a) `wss://fullnode.amber.centrifuge.io` for Amber or
b) `wss://fullnode.flint.centrifuge.io` for Flint
as the custom endpoint on the settings screen: